
Let me guess — every time you open that cabinet under your kitchen sink, something falls out and hits your foot. Yeah, been there. Organizing under a kitchen sink is already a puzzle, but throw a garbage disposal into the mix and suddenly you’ve got half the space, awkward angles, and pipes going in every direction. Fun times. :
I’ve spent way too many Saturday mornings reorganizing this exact spot in my own kitchen, and honestly? Once I cracked the code, it changed everything. Let me walk you through exactly how to make it work.
Why the Garbage Disposal Makes This So Tricky
Before we get into solutions, let’s talk about the elephant — or rather, the large metal cylinder — in the room.
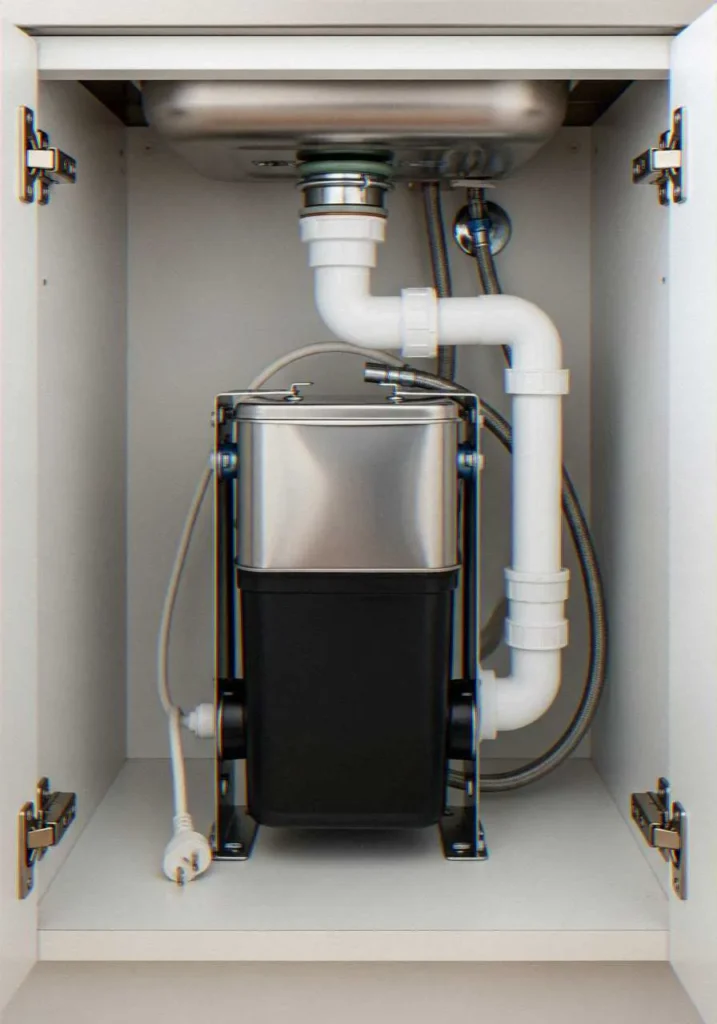
The unit of a garbage disposal is in the front of your sink and it occupies quite a lot of both vertical and horizontal space. It is also equipped with a power cord, a reset button that you will sometimes need to access and drainage pipes that are coming out of it at awkward angles. You can not simply push bins into it and consider that it is done.
The good news? Millions of people deal with this exact setup. That means there are tried-and-true solutions that actually work — and I’ve personally tested most of them.
Step 1: Pull Everything Out First

I know, I know. This feels like the annoying “obvious” advice. But hear me out.
You cannot organize a space you haven’t fully assessed. Pull every single bottle, sponge, random rubber band, and mystery cleaning product out of that cabinet. Lay it all on the kitchen floor. This is the moment you’ll realize you’ve been hoarding three half-empty bottles of the same dish soap. No judgment — I had four.
Once it’s all out, do three things:
- Toss anything expired or nearly empty — cleaning products do have shelf lives
- Consolidate duplicates where you can
- Group items by how often you use them (daily, weekly, rarely)
This step alone will probably cut your under-sink clutter by 30%. The space is already getting bigger.
Step 2: Map Out Your Available Space
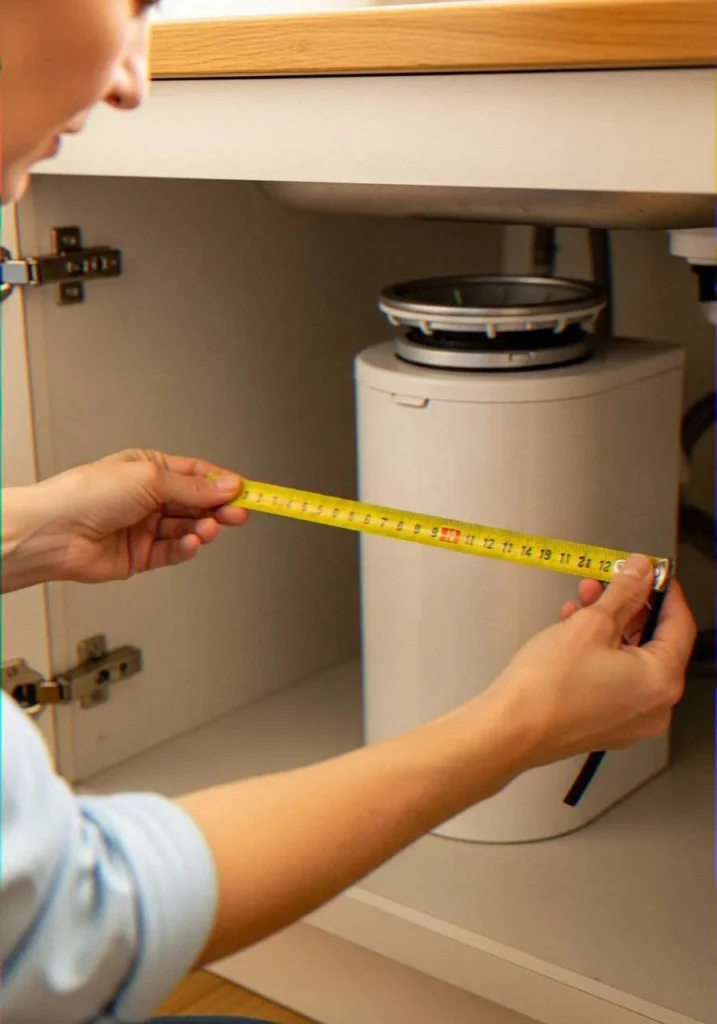
Here’s where experience really matters. Every garbage disposal setup is slightly different, so grab a tape measure and spend two minutes understanding your actual space.
Measure Around the Disposal Unit
Note the height clearance on each side of the disposal. In most kitchens, you’ll find:
- A taller zone on one or both sides of the disposal
- A shallow zone directly in front of the unit
- A narrow zone behind the disposal near the back wall
Don’t assume both sides are equal — plumbing often runs down one side, cutting into usable space.
Note Where the Pipes Are
The drain pipes and P-trap occupy the real estate as well. In my opinion, the greatest error that individuals commit is to acquire organizers without taking into consideration these pipes. The result is an ugly two-tier shelf physically unable to fit as a pipe is literally passing through where it should be. Spare me the one way back.
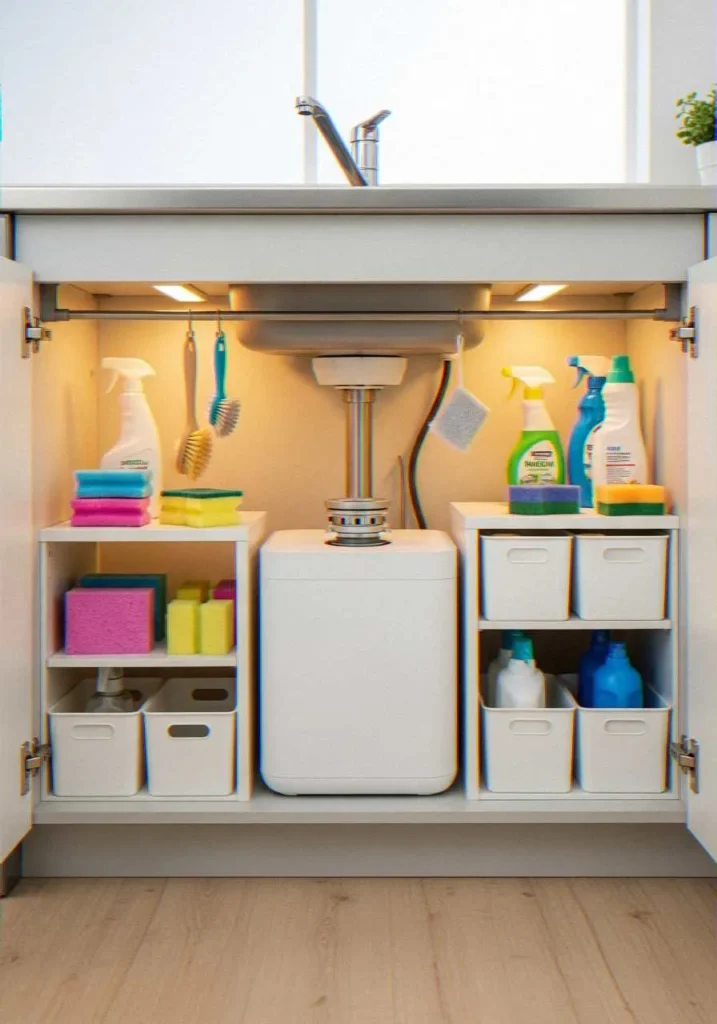
Step 3: Choose the Right Storage Solutions
Now the fun part. Here’s what actually works in a sink cabinet with a garbage disposal, based on my own kitchen and recommendations I’ve tested over the years.
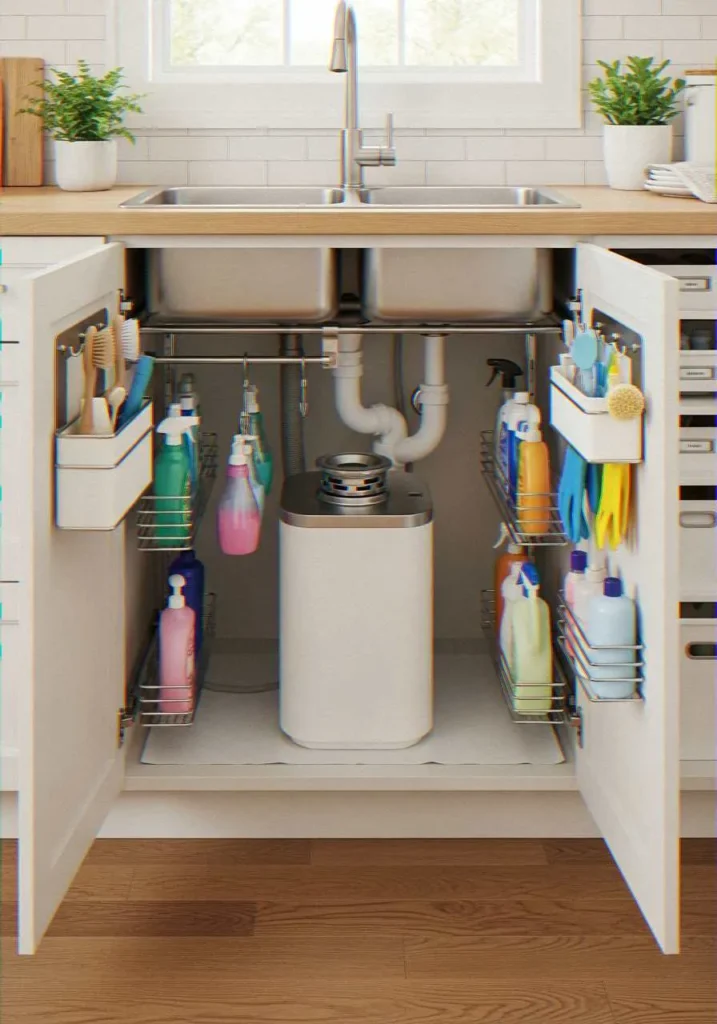
Tension Rod Trick (Seriously, Try This)
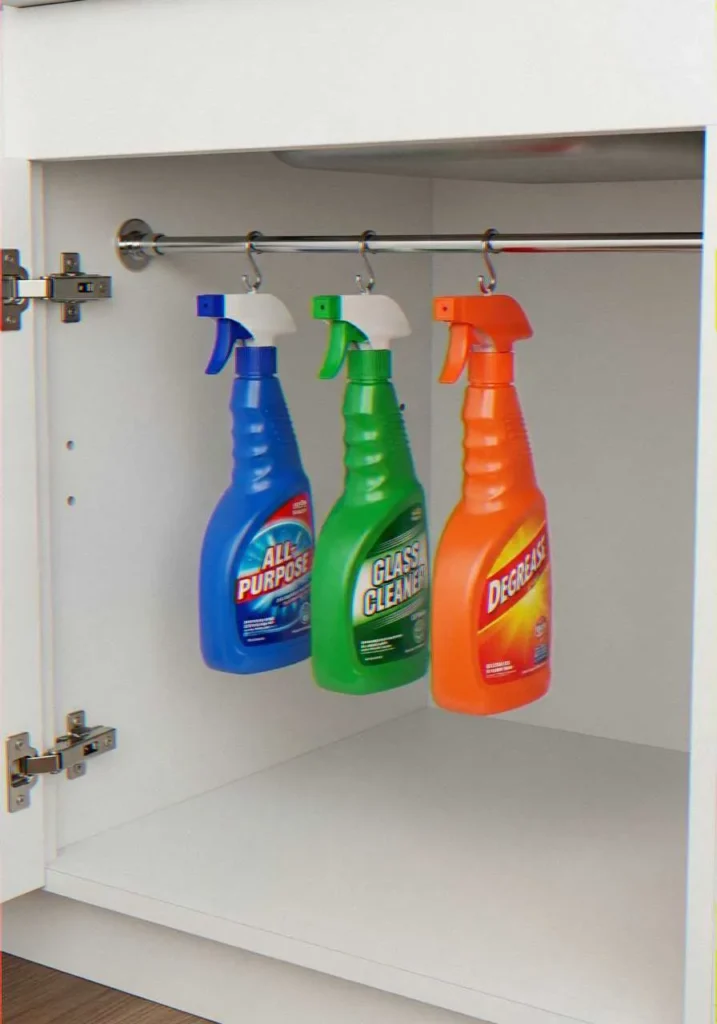
This is my favorite hack and it costs almost nothing. Install a tension rod horizontally near the front of the cabinet, just high enough to hang spray bottles by their trigger handles. This gets your most-used cleaners off the floor entirely and keeps them accessible.
I hang my all-purpose cleaner, glass cleaner, and degreaser on mine. Instant extra floor space. The disposal doesn’t interfere at all because the rod runs across the full width above it.
Stackable Pull-Out Drawers
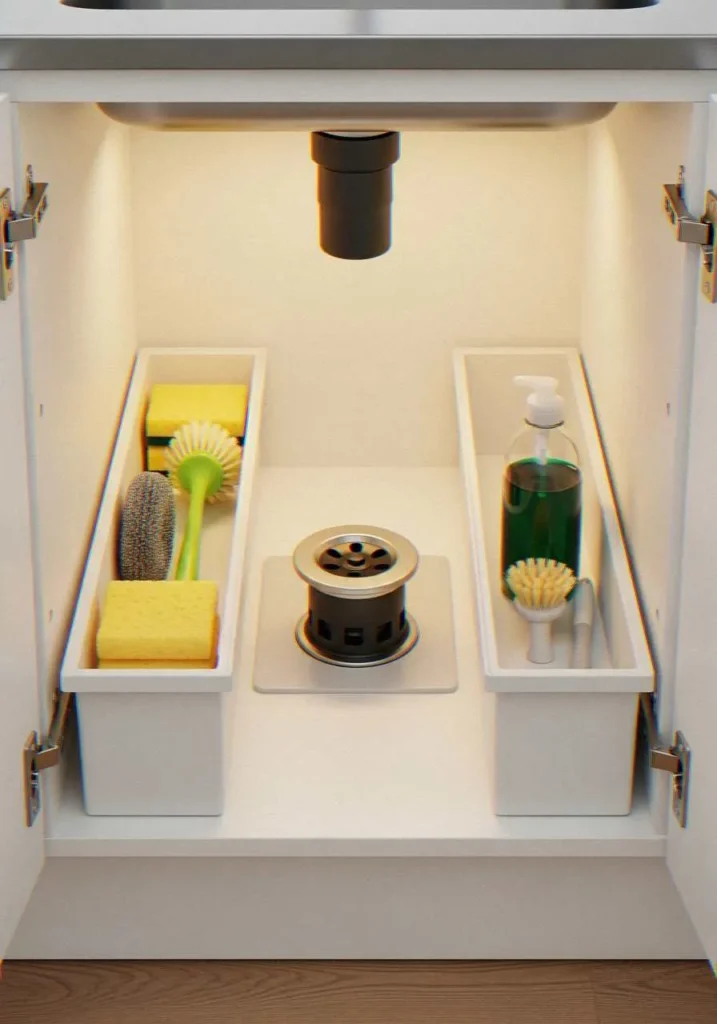
For the taller zones beside your disposal, narrow pull-out organizer bins are a game changer. Look for ones around 4–6 inches wide. You can stack two of them vertically and still have clearance.
Use these for:
- Sponges and scrubbers
- Dish soap and hand soap refills
- Small brushes and scrub pads
The pull-out feature matters more than you’d think — reaching around a disposal to grab something in the back is awkward, and a pull-out bin solves that completely.
Door-Mounted Organizers
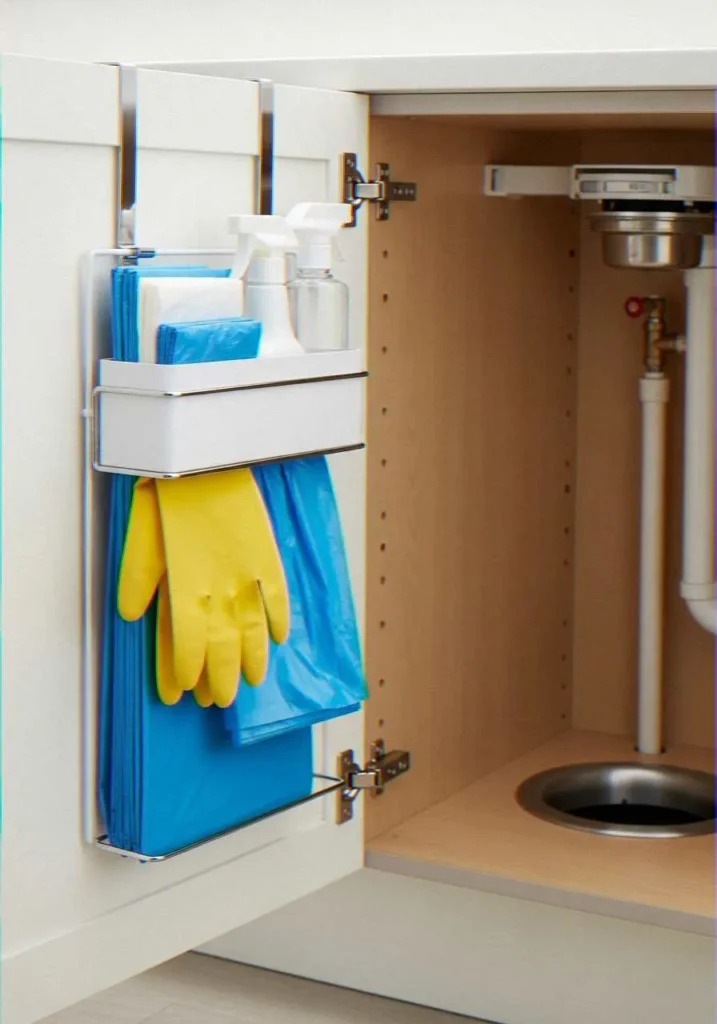
The inside of your cabinet door is basically free real estate that most people completely ignore. A door-mounted caddy or over-the-door organizer can hold:
- Trash bags (flat-folded or rolled)
- Rubber gloves
- Small spray bottles
- Dishwasher pods or tablets
Just check the door clearance before installing — some cabinet doors swing into shelving and won’t close properly with a bulky organizer on them. Measure twice, install once.
FYI, most door organizers come with adjustable mounting hardware that accommodates different door thicknesses.
A Small Lazy Susan for Corner Space
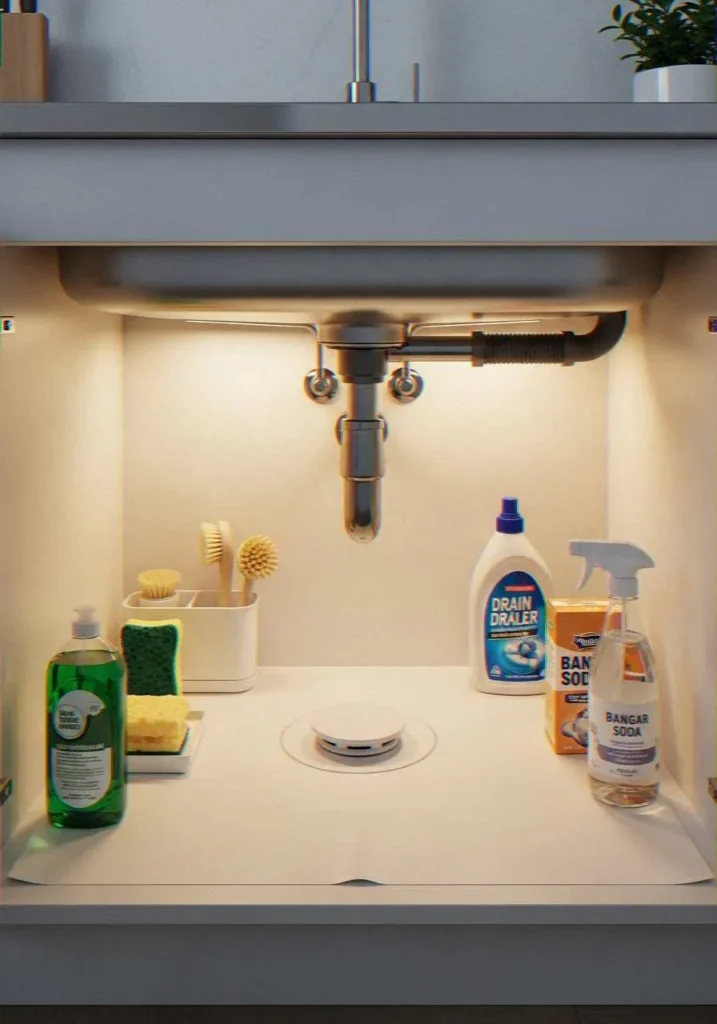
If your cabinet is wide enough, a small turntable or lazy Susan tucked beside the disposal is genuinely useful. It lets you rotate items to the front without doing an awkward reach-and-squint maneuver every time.
I use mine for less-frequent items — things like drain cleaner, baking soda, and the bottle of white vinegar I use for deep cleaning. Spin it, grab it, done.
Step 4: Work Around the Disposal (Not Against It)
Here’s the mindset shift that made everything click for me: stop treating the disposal as wasted space and start using it as a divider.
Think of your under-sink cabinet as two zones — left of the disposal and right of the disposal. Assign categories to each zone deliberately:
- Zone 1 (left): Daily-use items — dish soap, sponges, hand towels
- Zone 2 (right): Weekly or occasional items — heavy-duty cleaners, scrub brushes, drain maintenance supplies
That way, you do not have to dig and dig to find the sponge when you require one. The trash is placed midway like an extremely convenient (but unsightly) room divider. 🙂
Keep the Reset Button Accessible

One thing people overlook — your garbage disposal has a reset button on the bottom of the unit. It’s a small red or black button, and you’ll need it occasionally when the disposal jams. Make sure whatever you store directly under and around the disposal doesn’t block access to that button.
It’s a small thing until your disposal stops working and you’re on your hands and knees trying to find it behind three bottles of cleaning spray.
Step 5: Add Liners and Labels
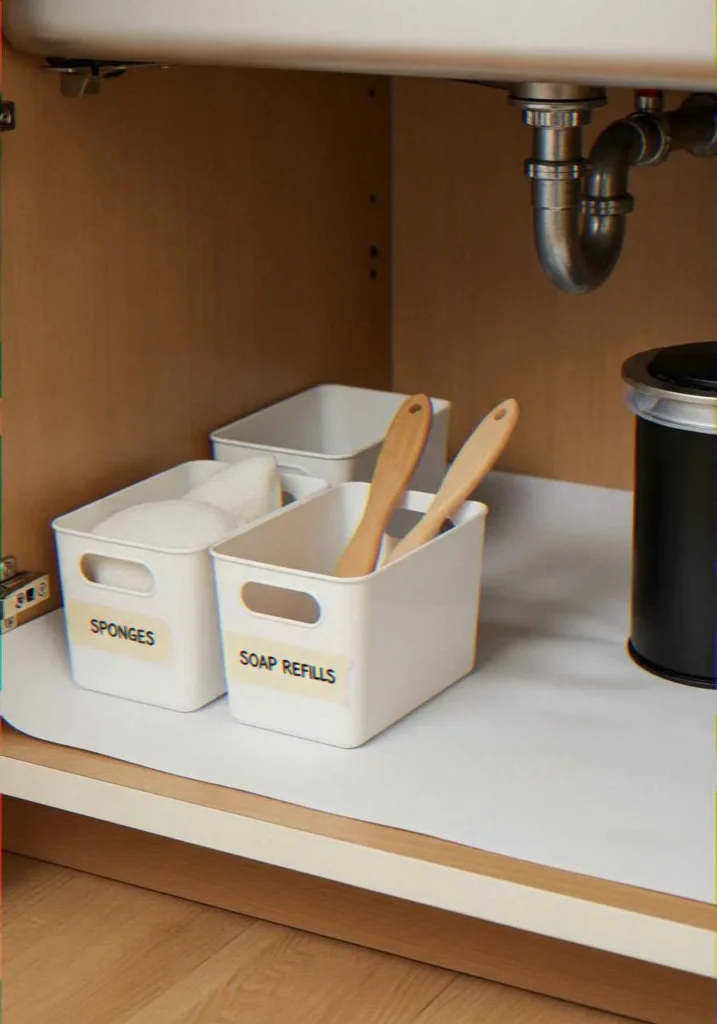
Two finishing touches that separate a functional space from a truly great one.
Shelf liners protect the cabinet floor from leaks and drips — which, under a sink, are basically inevitable at some point. Get waterproof ones. They’re easy to cut to size and even easier to wipe down.
Labels sound fussy, but they’re practical. When you or someone else grabs the wrong bottle in a hurry, labels prevent the “I thought this was the all-purpose cleaner” moment. Simple masking tape and a marker works fine. This isn’t a design magazine shoot — it just needs to function.
Step 6: Maintain It (The Part Everyone Skips)
The naked reality of organization is this; organization works only so long as you keep the system. The best laid out under-sink cabinet will be back to disorder in three months unless you install things back to their places and perform a clean-up every month.
Set a simple monthly reminder to:
- Toss anything empty or expired
- Wipe down the liner
- Check that nothing has migrated out of its zone
That’s genuinely it. Five minutes a month keeps this space functional all year.
My Favorite Products for This Setup
Based on personal use, here’s what I’d actually recommend:
- mDesign pull-out bins — slim, sturdy, easy to clean
- Command adhesive door hooks — for hanging items without drilling
- SimpleHuman tension rod caddy — built specifically for under-sink spray bottle storage
- Rev-A-Shelf under-sink organizer — a premium option if you want a built-in look
You don’t need all of these. Pick what solves your specific problem.
Final Thoughts
Organizing under a kitchen sink with a garbage disposal isn’t complicated — it just requires a bit of planning before you start buying things. Measure your space, work around the disposal strategically, use vertical space with pull-out bins and door organizers, and keep only what you actually use down there.
After doing it correctly, it is even pleasant rather than stressful to open that cabinet. And honestly? A little victory every day and it accumulates. Now draw all that out now and get going, your feet will be glad the next time you open a door in that cabinet.
Frequently Asked Questions
What are the best bamboo under-sink organizers for humid kitchen cabinets?
Bamboo organizers are a genuinely smart pick for under-sink storage, and here’s why I started recommending them to anyone who asked. Bamboo is naturally moisture-resistant, which matters a lot in a cabinet that sits directly below a water source. Brands like Greenco, Sorbus, and Lipper International all make bamboo under-sink shelving that holds up well in humid conditions.
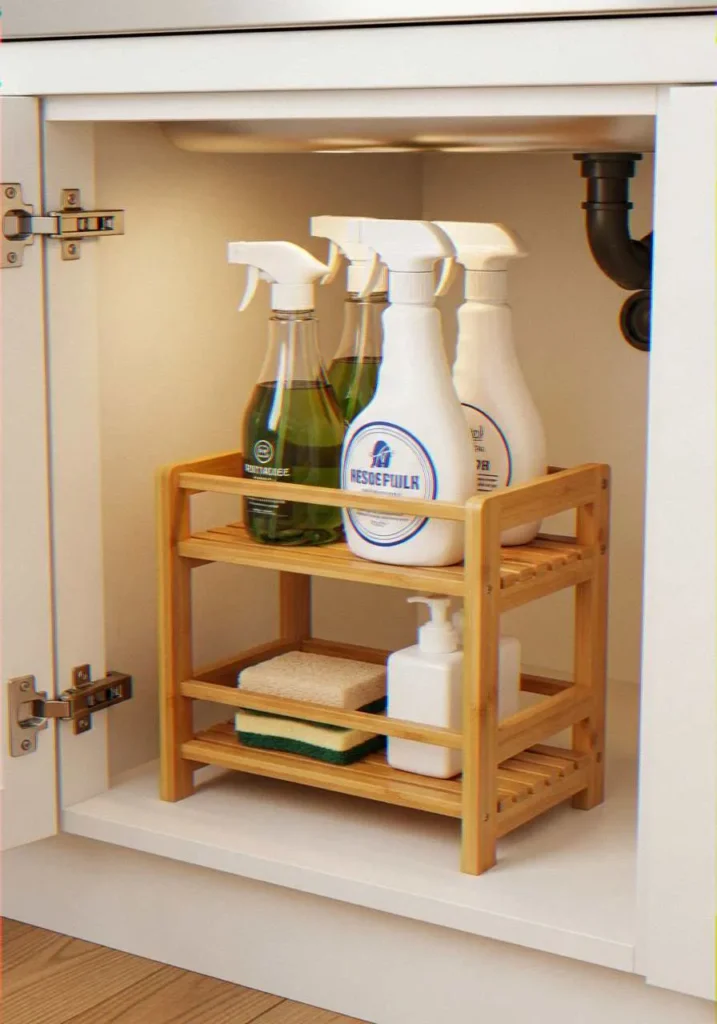
That said, not all bamboo products are equal. Look for organizers with a sealed or lacquered finish — bare, unsealed bamboo can still warp over time if moisture exposure is consistent. Also check that the product uses food-safe or non-toxic finishes, especially if you store dish soap or items that contact food near them. My personal pick? A two-tier bamboo shelf with an adjustable middle layer — it fits around pipes cleanly and the slatted design lets air circulate, which helps prevent moisture buildup underneath.
Why is my under-sink cabinet peeling and how can I cover it?
If your cabinet interior is peeling, you’re dealing with one of two things: moisture damage to the laminate or MDF surface, or just old age doing what old age does. Under-sink cabinets take more humidity exposure than almost any other cabinet in your kitchen, so this is a really common problem and nothing to feel bad about.
Here’s what actually works to fix and cover it:
- Peel-and-stick vinyl liner — this is the fastest fix. Cut it to size, press it over the peeling surface, and it creates a waterproof barrier that looks clean and fresh. Con-Tact brand makes durable options specifically for cabinet interiors.
- Paintable primer + cabinet paint — if the peeling is severe, sand down the loose bits first, apply a moisture-resistant primer, then a coat of semi-gloss cabinet paint. More effort, but a longer-lasting result.
- Adhesive shelf liner paper — a budget option that works fine for light peeling. It won’t hold up as long as vinyl, but it gets the job done quickly.
The root fix is always moisture control — if you don’t address any slow leaks or condensation issues, the new surface will eventually peel too. Check your pipes first.
How to prevent mold growth in a dark under-sink cleaning cabinet?
Dark/wet/closed=moisture/darkness/enclosed = Mold favorite real estate. Under-sink cabinets can cross all the items in that list, and thus yes, it is a real threat of mold, unless you are eager about it. This was something that I had to learn the hard way when I had discovered a fuzzy surprise in the back of a bottle of bleach one spring. Not fun.
Here’s my prevention routine:
- Fix any drips immediately — even a slow drip from a pipe joint creates enough moisture for mold within weeks
- Use a waterproof liner and replace it if it gets visibly damp or stained
- Place a small moisture absorber (like DampRid or a silica gel packet) in the corner of the cabinet — these are inexpensive and genuinely effective
- Leave the cabinet door cracked occasionally to let air circulate, especially after heavy sink use
- Wipe down the interior monthly with a diluted white vinegar solution — it’s a natural antifungal and won’t leave harsh chemical residue near your cleaning products
If you already see mold, clean it with a 1:1 water-to-white-vinegar spray, let it sit for 10 minutes, then scrub and dry completely before putting anything back. For larger patches, a diluted bleach solution works faster — just ventilate the space well while you work.
Is it safe to store flammable cleaning sprays under a kitchen sink?
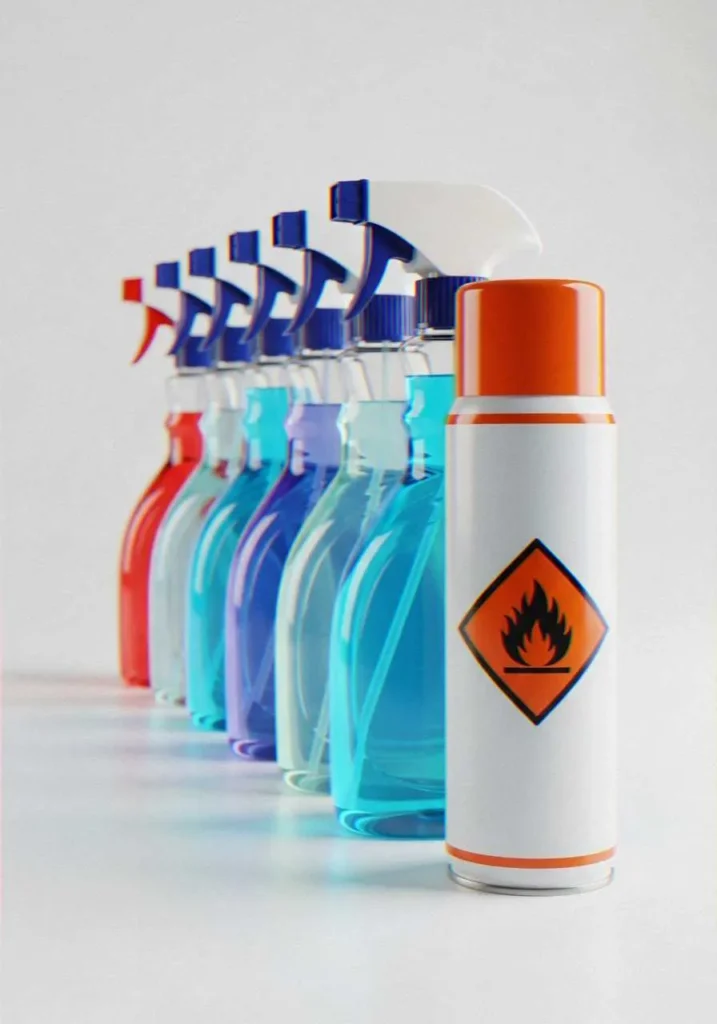
This is a question worth taking seriously, and I’m glad you’re asking it. The short answer: it depends on the product and how it’s stored. Most standard household cleaning sprays — all-purpose cleaners, glass cleaners, bathroom sprays — are water-based and not flammable in any meaningful way. Those are fine to store under the sink.
The products that need more careful handling include:
- Aerosol sprays (furniture polish, spray starch, some disinfectants) — aerosols are pressurized and can be flammable
- Products containing alcohol — hand sanitizer, some glass cleaners, certain disinfectant sprays
- Oven cleaners and degreasers with solvent-based formulas
- Lighter fluid or any petroleum-based products — these should never be stored under a kitchen sink, period
Check the label — any product with a flame icon or the word “flammable” in the warnings should be stored away from heat sources and ideally in a garage or utility cabinet rather than directly beneath a kitchen appliance like a garbage disposal that has an electrical motor.
The real risk under a kitchen sink is less about spontaneous combustion and more about leaks combining with poor ventilation. Keep flammable products upright, capped tightly, and never store them directly against electrical components or the disposal unit itself.
Why does my under-sink organizer keep sliding and how to fix it?
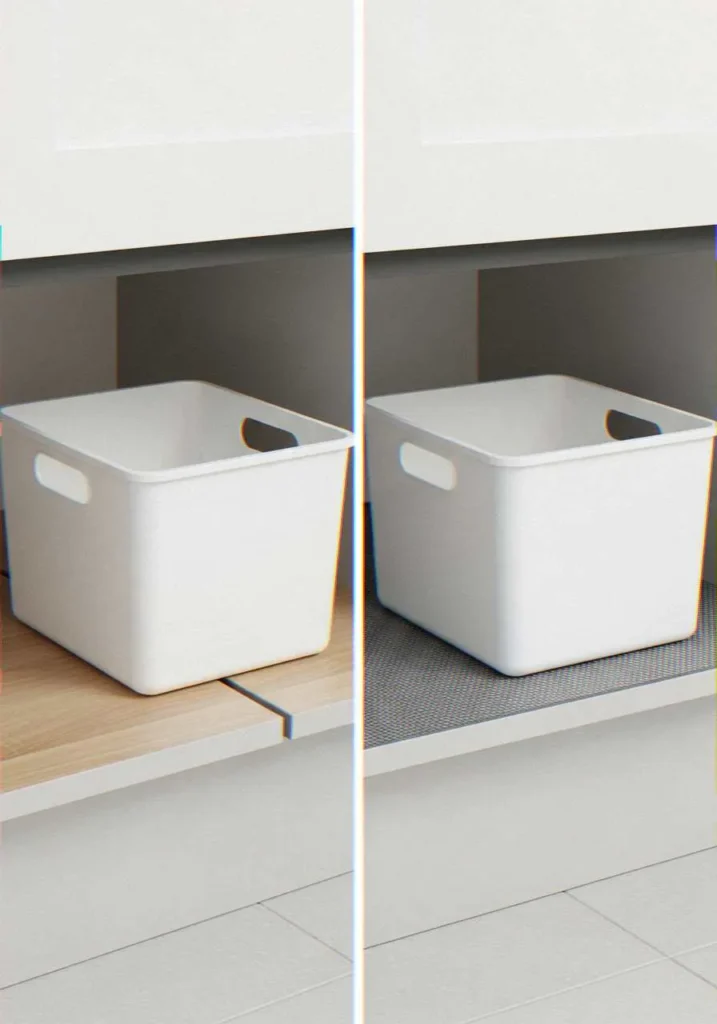
Oh, this one is making me mad as a hat. You take time to organize a beautiful system and three days after, it has been moved to the right and left side and ended up in a mess. Here is the reason why it occurs and how I resolved it in my own cabinet.
The main culprits:
- Smooth cabinet floors offer zero grip — organizers slide freely every time you open the door
- Lightweight bins shift when you pull one item out and the rest topple
- Cabinet floors that aren’t perfectly level (more common than you’d think)
The fixes that actually work:
- Non-slip shelf liner under every bin — this is the easiest fix and the first thing I try. Rubberized liner creates real friction and stops most sliding immediately
- Command strips or adhesive velcro — attach one side to the cabinet floor and the other to the bottom of your organizer. It holds firmly but releases cleanly when you need to remove or rearrange
- Furniture feet or rubber bumpers — stick small self-adhesive rubber bumpers to the bottom corners of organizer bins for added grip
- Tension-fit organizers — some under-sink systems use spring-loaded tension arms that press against cabinet walls to hold everything in place. These are the most stable option if you want a long-term fix
My personal go-to is rubberized liner plus a strip of adhesive velcro on anything that tends to migrate toward the door. That combination has kept my setup exactly where I put it for over a year now. Sometimes the low-tech solutions really are the best ones.