
You finally ripped out those upper cabinets, mounted some beautiful floating shelves, and stood back to admire your work. Then reality hit — you have no idea how to actually style these things without it looking like a garage sale threw up in your kitchen. Been there.
I’ve reorganized my open shelves no fewer than six times before landing on a system that actually works, and I’m sharing everything I learned so you don’t have to suffer through the same trial and error.
Open kitchen shelving is one of those things that looks effortlessly chic in every Pinterest photo, but in real life? It’s surprisingly tricky to pull off.
The good news: once you crack the code, it genuinely transforms your kitchen into a space that feels intentional, warm, and yes — actually functional.
Start With a Clear-Out: Stop Keeping Junk at Eye Level
Before you arrange a single thing, I want you to pull everything off those shelves. Every. Single. Item.
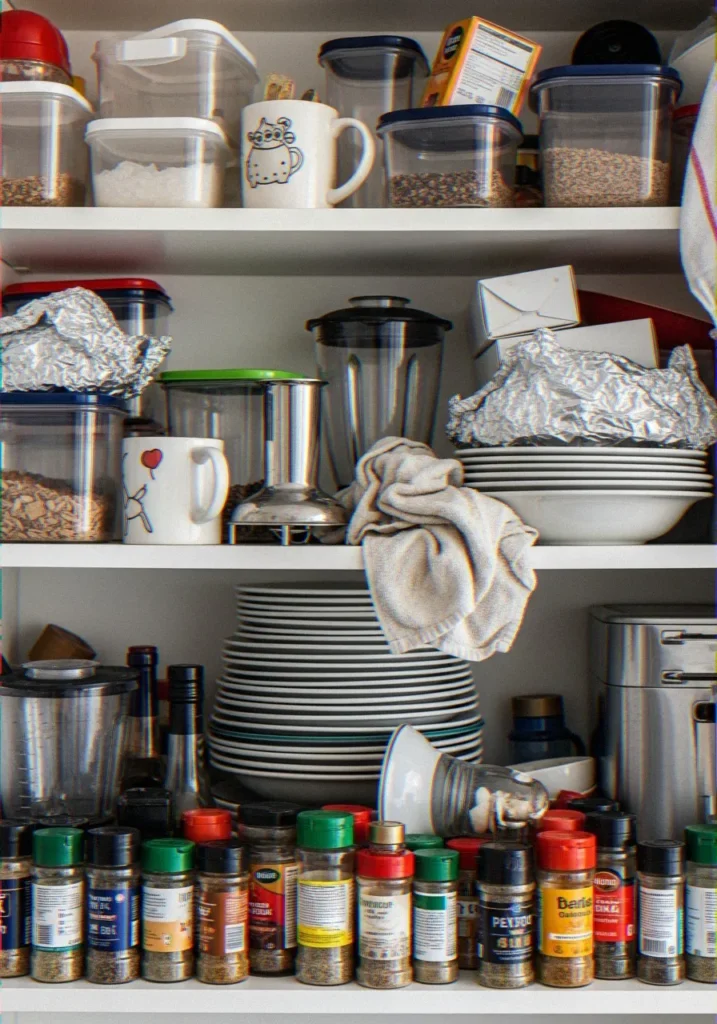
I did it with a full trash bag nearby, and I am going to tell you the truth this time around I found a novelty mug that I got in 2014 and an attachment to a blender that I did not even know that I had. Shelves that are open are not storage facilities. They are surfaces of display and, at the same time, they are useful. That is a nice point of difference.
The Three-Category Sort
Once everything is off, sort your items into three piles:
- Keep on shelves — things you use regularly AND that look good
- Move to closed storage — useful but visually cluttered (think plastic containers, random lids, foil boxes)
- Donate or toss — duplicates, things you haven’t touched in a year, anything broken
IMO, this edit phase is where most people go wrong. They skip the ruthless sorting and then wonder why their shelves always look chaotic. Less is genuinely more here — you want breathing room between objects.
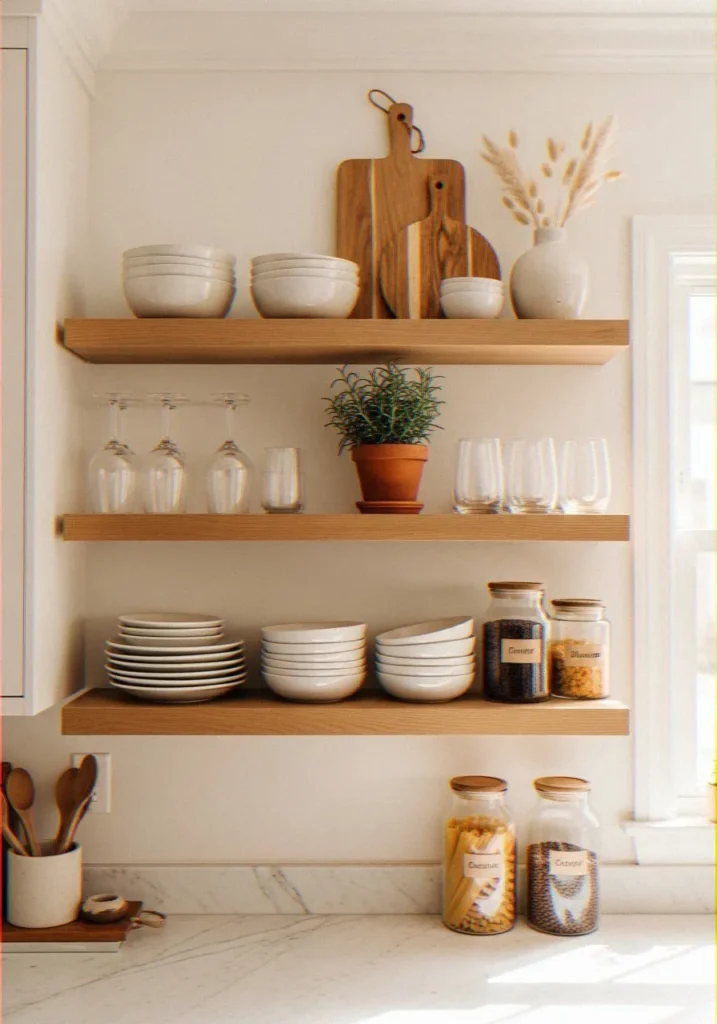
Build a Visual Foundation: The Rule of Three (and Why It Works)
Here’s the thing about styling shelves that nobody tells you upfront — it’s closer to interior design than home organization. And there’s a simple visual principle that makes everything click: the rule of three.
Make pairs of things, particularly, threes. Three layered bowls, three different objects of different height, three different textures. Odd groupings of things appeal to our eyes far more than even ones. I am sure this is woo-woo but do it and you will realize the change.
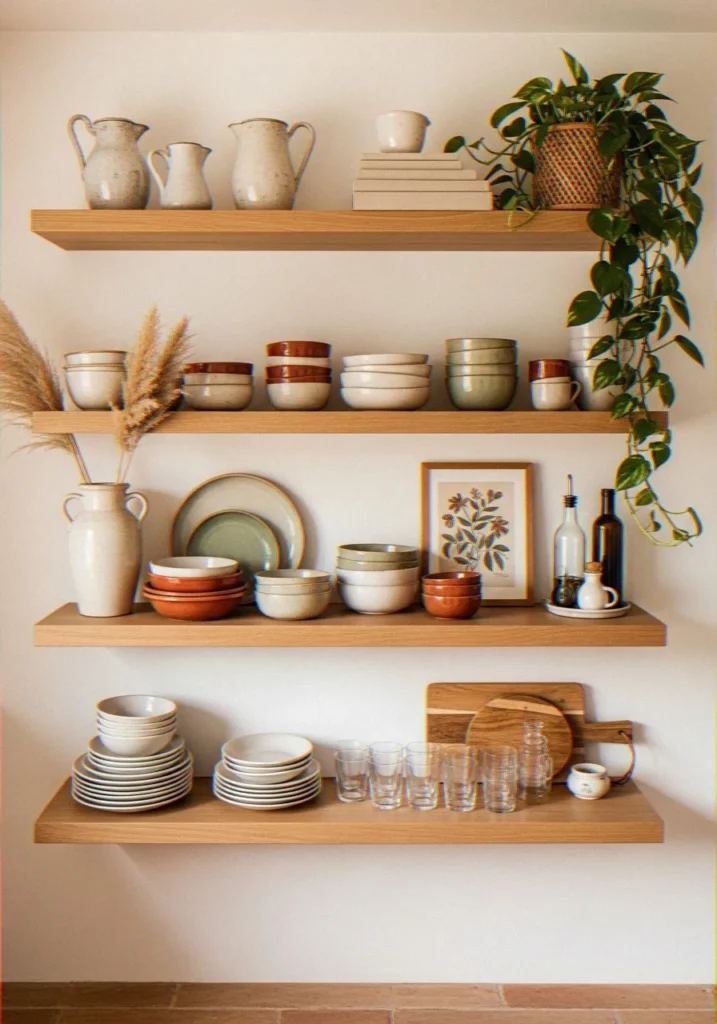
Mix Heights, Textures, and Materials
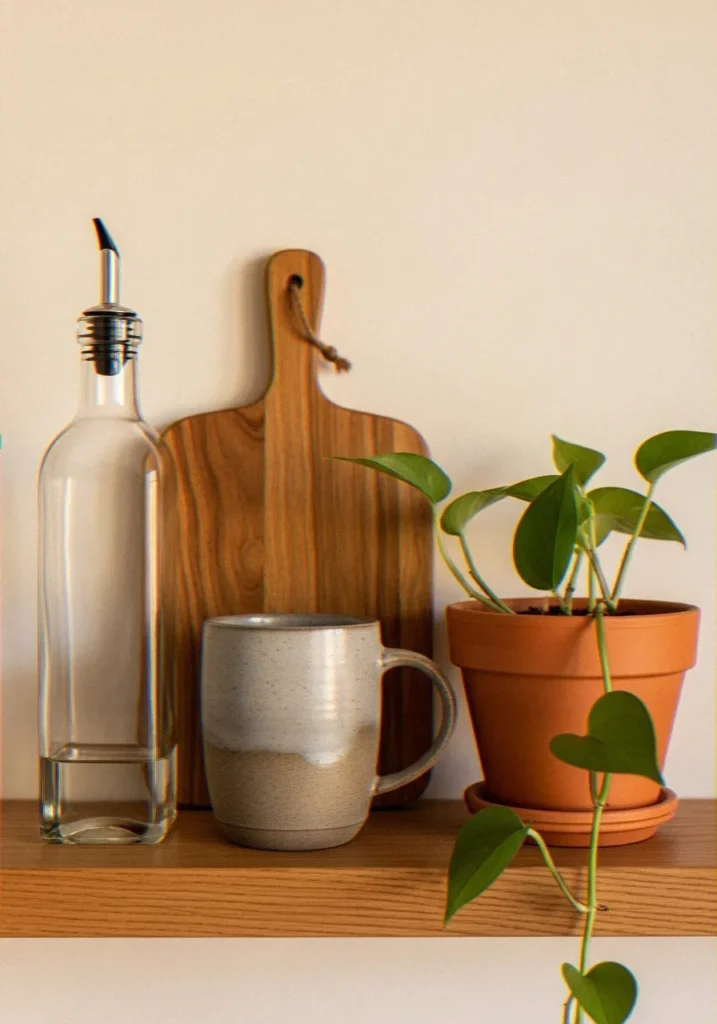
My shelves genuinely started looking polished the moment I stopped grouping things by category alone and started thinking about contrast. Here’s what I mean:
- Height variation — stack some items, let others stand solo, use a plant or tall bottle to add vertical interest
- Texture mix — matte ceramics next to glossy glass next to raw wood creates depth
- Material contrast — a brass canister beside a terracotta pot beside a linen-wrapped object reads as curated, not cluttered
Think of each shelf as a little scene, not a row of stuff.
The Functional Must-Haves: What Actually Belongs on Open Shelves
Okay, let’s talk about the items that earn their spot — because not everything you own gets to live in the spotlight. After years of tweaking my own setup, I’ve landed on a pretty reliable shortlist of what works.
| Item | Why It Works |
|---|---|
| Plates & Bowls | Easy to grab and looks neat when stacked |
| Glasses & Mugs | Practical for daily use and decorative |
| Cutting Boards | Adds texture and warmth |
| Small Plants | Brings life and color to shelves |
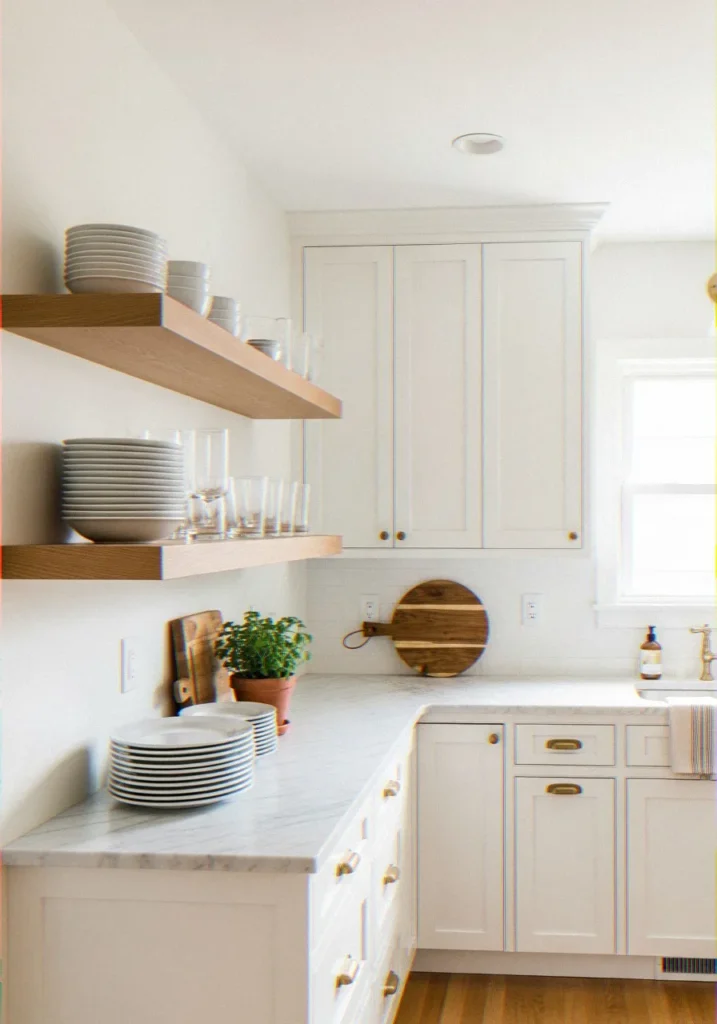
Daily-Use Items (The Practical Core)
These are the things you reach for constantly, so they need to be accessible:
- Everyday dishes — a stack of 4–6 plates and bowls in a neutral color looks clean and purposeful
- Glasses and mugs — arrange by height, keep it tight so they don’t tip
- Cutting boards — leaned vertically against the wall, they double as decor (especially wooden ones)
- A cookbook or two — opened to a beautiful page, or bookmarked with a pretty ribbon
Keep your most-used items on the easiest-to-reach shelf. Top shelves are for less-frequent items or purely decorative pieces.
Decorative Elements (The Visual Stars)
These are what elevate a functional shelf to a styled one:
- A small potted herb — rosemary and trailing pothos both work beautifully and add life
- Ceramics with personality — handmade-looking vessels, anything with texture or irregular edges
- One or two vintage or thrifted finds — they give the whole setup soul
- A small framed print or tile — leaned against the back wall to add visual interest
Color Cohesion: How to Make It Look Like You Have Your Life Together
This is my personal experience, and it can be quite plain and simple: My shelves became orderly the moment I decided to stick to a color scheme. I used to have a red Kitchen aid mixing bowl, teal mugs, yellow plates, and forty other colors and colors fighting to be noticed before that. It was resembling a kindergarten classroom. :/
Pick two to three colors and stick to them. For me, it’s warm whites, natural wood tones, and muted terracotta. For you, it might be all-white ceramics with black accents, or sage green with brass and cream.
The Neutral-Base Strategy
If you’re not sure where to start, go almost entirely neutral. White or cream dishes, natural wood elements, clear glass. Then introduce one accent color in small doses — a few matching canisters, a colored vase, a plant pot. This approach almost always looks intentional without requiring much effort.
Practical Organization Systems That Actually Hold Up
Looking good is half the battle. But your shelves also need to work for how you actually cook. Here’s what I’ve tested and kept:
Grouping by Use Zone
Rather than arranging purely by aesthetics, think about cooking workflows. I keep my coffee setup (mug, small pour-over dripper, a tiny plant) in one corner of a shelf near the coffee maker. My everyday plate stack is right above where I plate food. When function and form align, the whole system sustains itself.
- Put breakfast items together (bowls, mugs, small plates)
- Keep baking staples (oil, salt, a spice or two) near your prep area
- Group “grab and go” items at arm’s reach
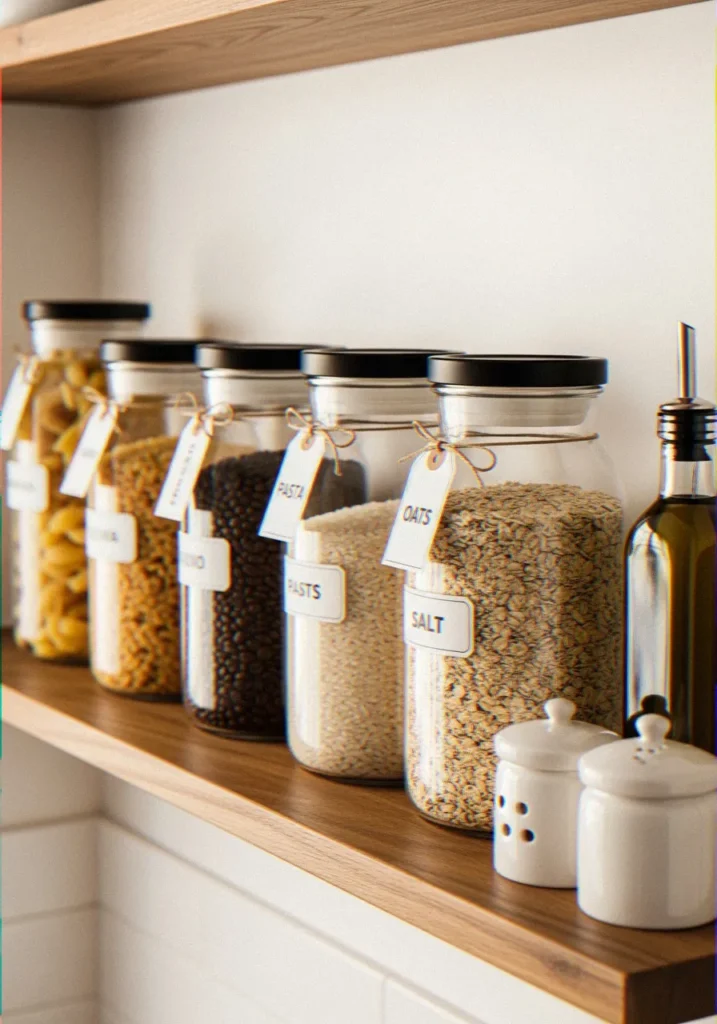
Decant What You Can
FYI — decanting transforms open shelving. When cooking oils, salt, and dry staples go into cohesive glass or ceramic containers, the whole shelf reads as polished instead of cluttered.
https://en.wikipedia.org/wiki/DecanterI use simple apothecary-style glass jars for things like pasta, lentils, and coffee beans. It takes maybe 15 minutes to set up and makes a visible difference every single day.
Maintenance: How to Keep It Looking Good (Without Daily Effort)
Here’s the secret nobody mentions in those dreamy shelf styling posts: open shelves need regular light maintenance. Everything is exposed, so dust, grease, and cooking residue accumulate faster than in closed cabinets. That’s just the trade-off.
My Weekly 5-Minute Reset

Every week or so, I do a quick reset:
- Wipe down shelves with a damp cloth (especially in the cooking zone)
- Straighten any plates, cups, or items that have shifted
- Replace anything dead in the plant situation
- Return anything that drifted back to its spot
That’s it. With a basic system and stripped down items, a reset does not take much time. When the shelves are over-crowded, then it is a nightmare with maintenance.
Common Mistakes to Avoid (Trust Me on These)
I’ve made every single one of these, so you don’t have to:
- Too many items — the number one killer of shelf styling; when in doubt, take one more thing off
- No negative space — leave intentional gaps; packed shelves read as chaotic
- Mismatched storage containers — generic plastic bins and mismatched Tupperware containers undermine even the prettiest ceramics
- Ignoring the back wall — a coat of paint or removable wallpaper on the back wall of a shelf adds serious depth and drama
- Forgetting lighting — a small LED strip under a shelf above makes everything glow; it’s a genuine upgrade
Frequently Asked Questions
How to organize spices on open kitchen shelves without looking cluttered?
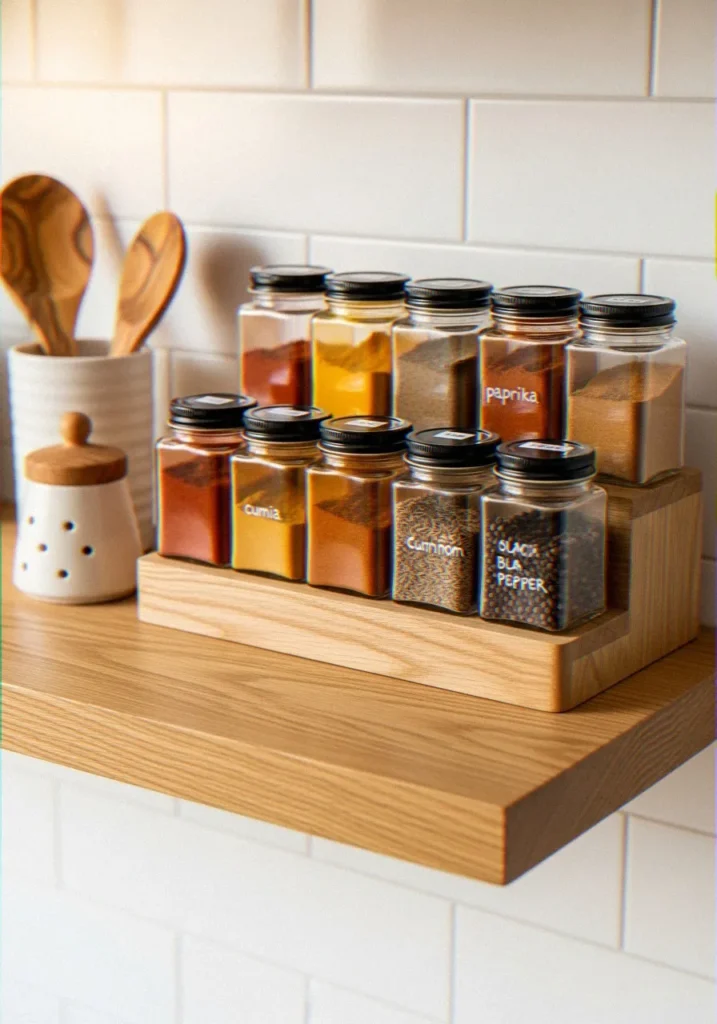
Frankly speaking spices are the hardest to dress up in open shelves, since you have so many of them, they are in bottles of all kinds and sizes, and the labels are going all ways. It took me some time before I broke into this.
The solution is decanting and uniformity. Transfer your most-used spices into matching small glass jars (I use 4oz square glass jars with black lids — cheap and they look sharp). Label them on the top, not the side, so you can grab what you need without pulling everything out.
Here’s my system that actually holds up:
- Group spices in a small tray or riser — a wooden tray corrals them into a defined zone, so they don’t spread across the whole shelf
- Keep only your 8–10 most-used spices on display — everything else goes in a drawer or a cabinet
- Use a tiered spice riser — so back-row spices stay visible and accessible
- Match your containers — mismatched bottles are the #1 reason spice shelves look messy; even just matching the lids makes a huge difference
And please — retire that giant Costco paprika container from 2019. It’s not doing anyone any favors on an open shelf. :/
How to keep dust off everyday glasses on open kitchen shelves?
This is a real and underrated issue. Glasses on open shelves accumulate dust fast, especially near the cooking zone. Here’s how I handle it without constantly rewashing everything:
Store glasses upside down. This is the simplest fix — flip them so the rim faces down. Dust settles on the base instead of inside the glass, and the drinking surface stays clean. I switched to this approach and it genuinely cut down my “re-rinse before use” habit significantly.
A few more strategies that help:
- Install a shelf with a lip or use a tray — this keeps glasses grouped and limits airflow that carries grease particles
- Place glasses away from the stovetop — even a few feet of distance makes a real difference; grease vapor is the main culprit
- Wipe shelves weekly — a quick pass with a damp microfiber cloth keeps grime from building up and transferring to your glasses
- Use a glass cloche or small cabinet insert — if your shelves are near heavy cooking zones, a simple acrylic cover can protect your glassware while still looking intentional
The honest truth? Open shelves near active cooking areas will always need more maintenance than closed cabinets. That’s the trade-off — and knowing that upfront makes the upkeep feel less annoying.
What is the best way to display mixing bowls on open kitchen shelving?
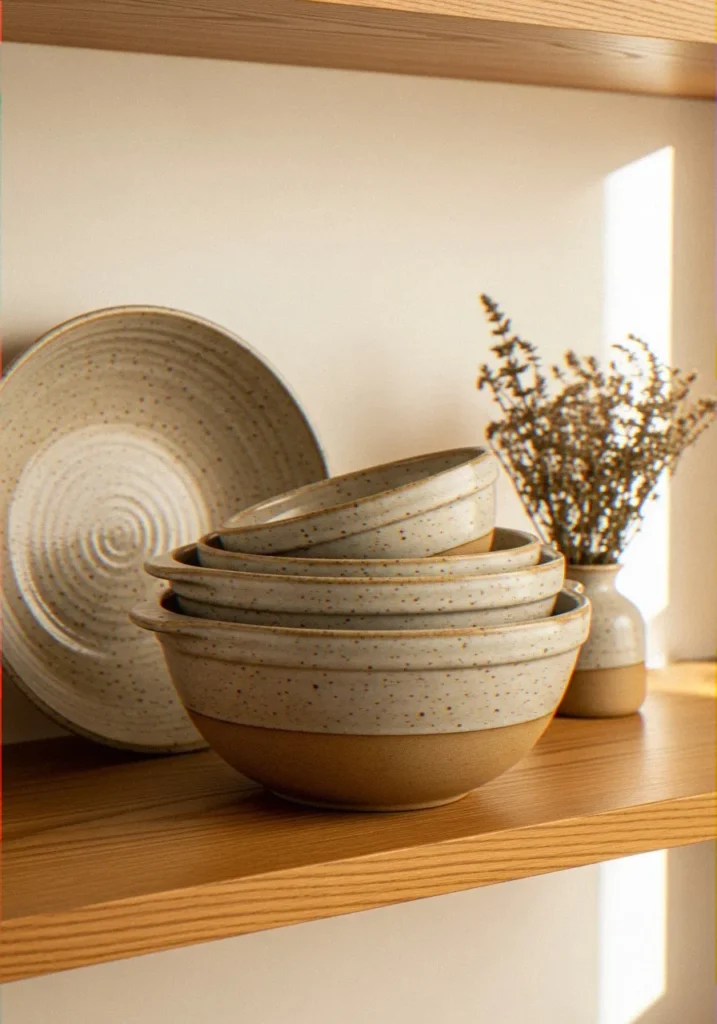
Mixing bowls are, in fact, among my favorite items to showcase – since done correctly they appear truly beautiful and are made to be functional. The trick is to consider them as a sculptural component rather than the cookware that is merely stored.
Nest and stack them by size, largest at the bottom. A set of three or four nested bowls creates a natural visual pyramid that looks intentional. If your bowls have a beautiful glaze, color, or texture — face the most attractive one outward.
Here’s what works best for different styles:
- Ceramic or stoneware bowls — these are the best for open display; their natural, handmade look adds warmth to any shelf
- Matching sets — even two matching bowls look more curated than four random ones; invest in a cohesive set if you’re styling for aesthetics
- Mixed sizes, one color family — if you have different brands, try to keep them in the same color tone (all neutrals, all one accent color) so the stack reads as cohesive
- Lean one bowl upright — for a beautiful ceramic bowl, try leaning it vertically against the back wall of the shelf like a piece of art; it adds visual interest and shows off the design
What I’d avoid: plastic mixing bowls on open shelves. They tend to look cheap even when they’re not, and they break the visual flow of a styled shelf. Keep those in a lower cabinet and display the pretty ones front and center.
People Also Search For
Kitchen With Open Shelves and Cabinets
Can’t fully commit to going all-open? Totally understandable — and honestly, the mixed approach is my personal favorite. A kitchen with both open shelves and closed cabinets gives you the best of both worlds: the visual warmth of styled open shelving, plus the practical, clutter-hiding power of cabinet doors.
Here’s how to make the combination work seamlessly:
- Use open shelves for display, cabinets for storage — show off your prettiest ceramics and glassware on the open sections, and hide your Tupperware mountain behind closed doors
- Keep the open shelves near the main focal point — typically above a coffee bar, beside the fridge, or flanking a window; these spots get the most visual attention
- Match materials — if your cabinets are white, use white or natural wood floating shelves so everything reads as one cohesive design
- Don’t overcrowd the open sections — the closed cabinets are doing the heavy lifting storage-wise, so your open shelves can stay light and curated
Another advantage of this hybrid installation is that the dust-and-grease issue is resolved, as your most susceptible products (dry goods, plastic containers, common appliances, etc.) are stored behind doors. Win-win.
Open Kitchen Shelves Decorating Ideas — Pinterest Style
If you’ve been scrolling Pinterest for open shelf inspo, you’ve probably noticed a few recurring aesthetics that genuinely work. Here’s a breakdown of the most popular looks and how to actually pull them off at home:
The Minimal Neutral Look
- All-white or cream dishes, clear glass, natural wood accents
- One or two small plants (trailing pothos works beautifully)
- Zero clutter — negative space is intentional
- Best for: modern, Scandinavian, or coastal kitchens
The Warm Earthy Look
- Terracotta, warm browns, sage green, and rust tones
- Handmade ceramics, woven baskets, raw wood boards
- A mix of textures: linen, clay, rattan
- Best for: cottagecore, bohemian, or Mediterranean-style kitchens
The Bold and Graphic Look
- Black shelves or a dark accent wall behind white dishes
- Clean lines, strong contrast, minimal decoration
- Matching black hardware on any hooks or brackets
- Best for: industrial, contemporary, or statement kitchens
The Collected and Layered Look
- A mix of vintage finds, travel souvenirs, and heirloom pieces
- Books, artwork, and objects alongside functional kitchen items
- Feels personal and lived-in rather than designed
- Best for: eclectic or maximalist kitchens where personality leads
The key takeaway from Pinterest’s best shelf content? Every stunning shelf has intention behind it. Even the “casual” ones were styled carefully.
Kitchen With Open Shelves and Cabinets Ideas
If you’re planning a kitchen renovation or a refresh and you want to incorporate both open shelving and cabinetry, here are some layout ideas worth considering:
- Open shelves above, closed cabinets below — the most common arrangement; lower cabinets handle pots, pans, and appliances while upper open shelves display everyday dishes and decor
- One open-shelf wall, one full-cabinet wall — great for larger kitchens where you can dedicate different walls to different functions
- Open shelves flanking a window or range hood — a classic look that frames a focal point beautifully while keeping the shelves away from heavy steam zones
- A dedicated open-shelf coffee or drink station — carve out one small section of open shelving specifically for your coffee setup, bar cart items, or morning routine essentials
- Open shelves inside a kitchen island — if your island has an open side facing the dining area, a few styled shelves there add visual interest from both the kitchen and the living space
The most important thing when mixing both? Make the open-shelf sections genuinely worth looking at. They’re the visual anchors of your kitchen — treat them that way.
Final Thought: Your Shelves Should Look Like You
The best-looking open kitchen shelves aren’t the ones that look exactly like a design magazine spread — they’re the ones that feel like someone real actually lives and cooks there.
Have a few items that are meaningful to you which might be a handmade mug made by a local potter, a bottle of the olive oil you liked on a trip, or an old cookbook you had inherited by your grandmother.
Function and beauty aren’t competing priorities. When you edit thoughtfully, group intentionally, and maintain consistently, your open shelves become one of the most charming features in your entire home.
So go ahead — pull everything off, start fresh, and style those shelves like the kitchen enthusiast you are. 🙂
2 thoughts on “How to Organize Open Kitchen Shelving to Look Decorative and Functional”