
Look, I’m just going to say it — small kitchens are frustrating. You bump into the counter, the fridge door hits the cabinet, and somehow there’s never enough space to chop an onion without knocking something over.
I lived in a 9×10 kitchen for three years and honestly? It nearly broke me. Then I added a peninsula and suddenly the whole thing clicked. More counter space, a place to eat, storage underneath — it was like the kitchen finally made sense.
A peninsula isn’t just a design trend. It’s a practical solution that connects to an existing wall or cabinet run, so it doesn’t steal floor space the way a freestanding island does. And for small kitchens specifically, that distinction matters a LOT.
So whether you’re planning a full remodel or just exploring what’s possible, here are 26 ideas that genuinely work — tested, researched, and pulled from real kitchens, not just Pinterest boards.
Quick Overview: What Makes a Peninsula Work
| Feature | Details |
|---|---|
| Minimum Space Needed | 10×10 ft kitchen recommended |
| Walkway Clearance | 42″ working side, 36″ minimum elsewhere |
| Average Cost Range | $1,500 – $20,000+ depending on scope |
| Best For | Storage, seating, zoning, counter space |
Why a Peninsula Beats an Island in a Small Kitchen
Honestly, islands get all the glory but peninsulas do the real work in tight spaces. An island needs clearance on all four sides — that’s 42 inches per side if you want to move comfortably.
A peninsula connects to your existing cabinetry, so you only need clearance on three sides. In a small kitchen, that saved space is genuinely massive.
I’ve seen people try to squeeze a 4-foot island into a small kitchen and it just… doesn’t work. It blocks the fridge, kills the workflow, and makes the whole space feel more cramped, not less.
A peninsula solves all of that without forcing you to compromise. And bro, once you add bar seating on the open side, you’ve basically eliminated the need for a dining table too. That’s two problems solved with one renovation.
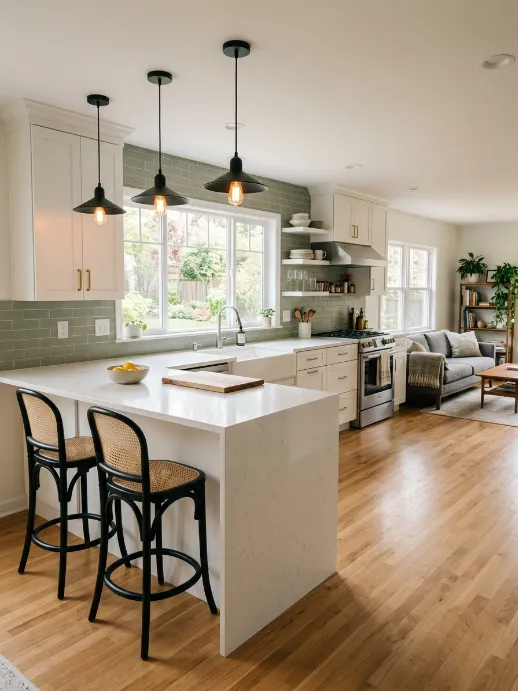
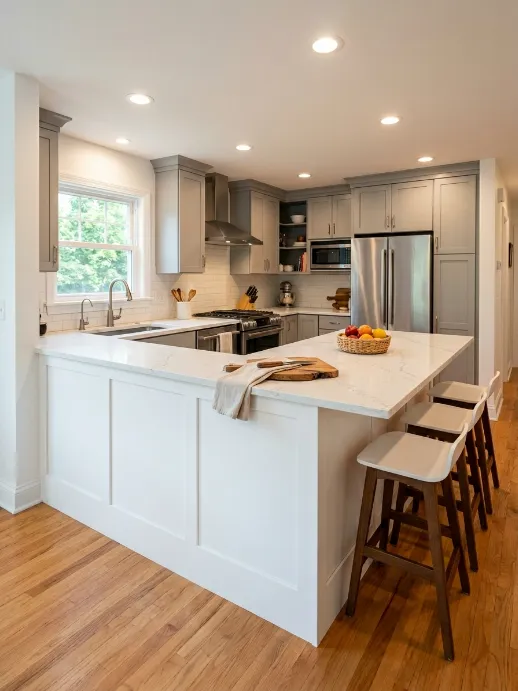
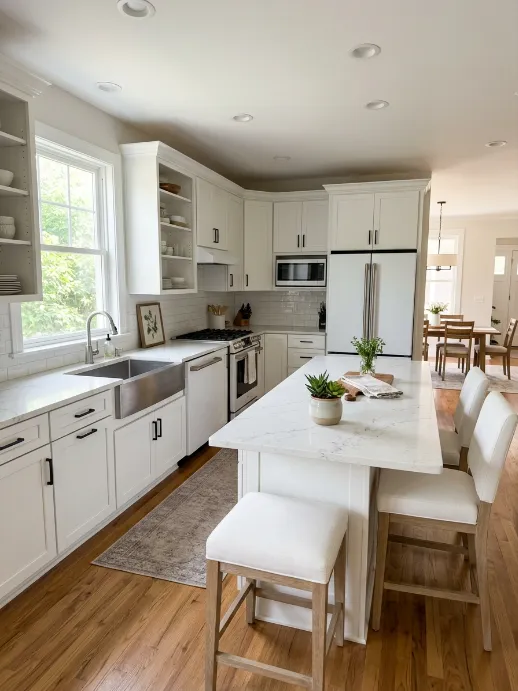
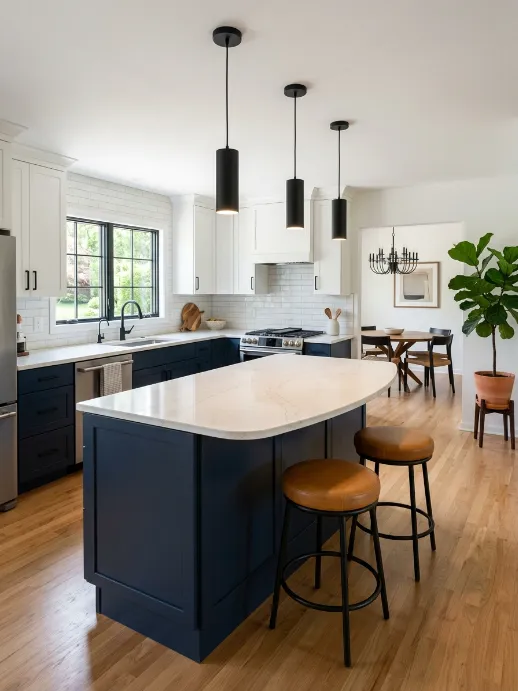
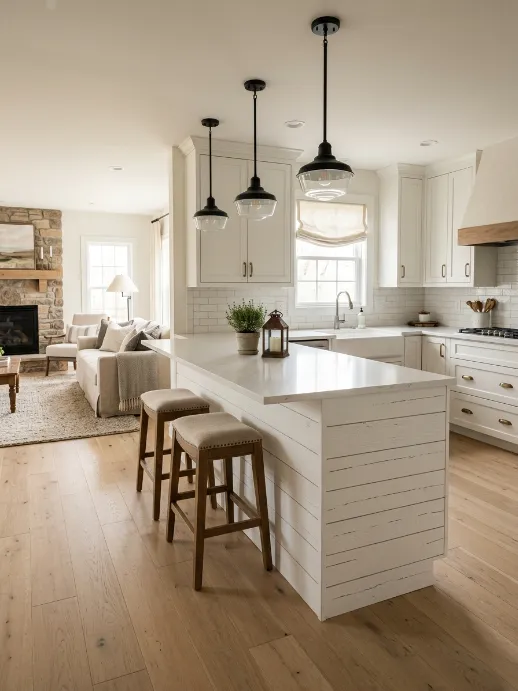
1. The Classic L-Shape Peninsula
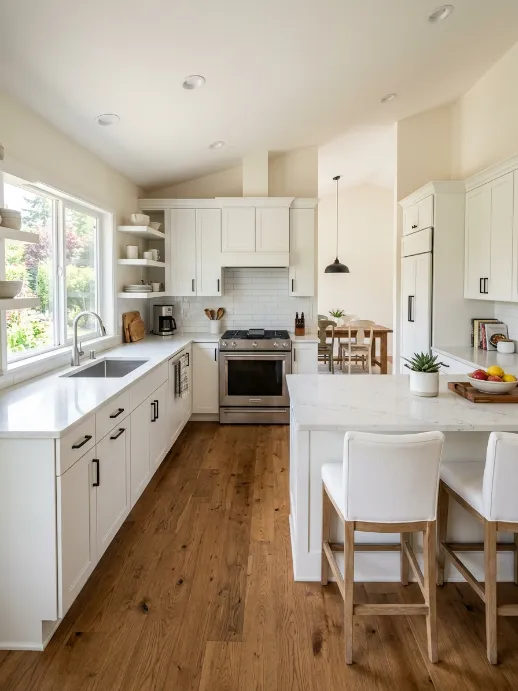
This is the layout most designers recommend first — and for good reason. You take your existing L-shaped kitchen and extend one leg of the L outward to create the peninsula.
It feels natural, it keeps the work triangle intact, and it gives you an obvious spot for bar seating on the open end.
I tried this exact layout in a kitchen remodel I helped plan for a friend’s apartment, and the transformation was wild. The kitchen went from claustrophobic to genuinely functional. Nothing fancy, just smart use of existing space.
Why it works:
- Maintains smooth traffic flow
- Creates a natural breakfast bar
- Adds counter space along the open end
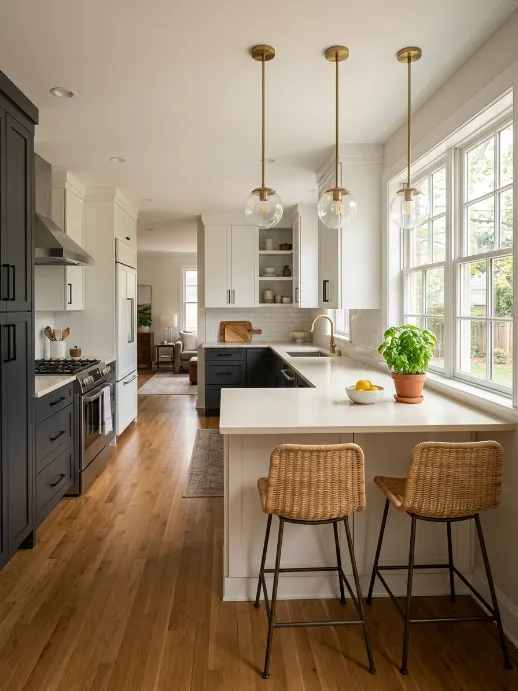
2. Peninsula With Bar Seating
This one is, IMO, the single best upgrade you can make to a small kitchen. Instead of squeezing a dining table into your living room, you pull a couple of bar stools up to the peninsula and boom — that’s your dining area sorted.
The overhang is key here. You need at least 12 inches of overhang for comfortable knee clearance, and 15 inches if you want people to actually sit there for more than five minutes without complaining.
These work brilliantly with counter-height peninsulas and come in a bunch of finishes. I’ve seen them in three different kitchens now and they always look right.
3. Slim Peninsula for Tight Spaces
People always assume a peninsula needs to be huge. It doesn’t. An 18-to-24-inch-deep peninsula still adds meaningful prep space and can seat two people comfortably.
If your kitchen is genuinely tiny, don’t rule this out before you measure properly — you might be surprised what fits.
The slim version works especially well in galley kitchens where you can close one end of the corridor into a U-shape. It adds surface area without destroying the narrow walkway that makes galley kitchens actually functional.
4. Open Shelving on the Peninsula

Skip the upper cabinet doors on your peninsula and go with open shelves on the kitchen-facing side instead. It keeps things visually light, makes your most-used items easy to grab, and stops the peninsula from feeling like a big heavy box in the middle of your kitchen.
Honestly, closed cabinets on a peninsula can make a small kitchen feel darker and boxier. Open shelves fix that instantly. Just be prepared to keep things tidy — open shelving is brutally honest about clutter. 😅
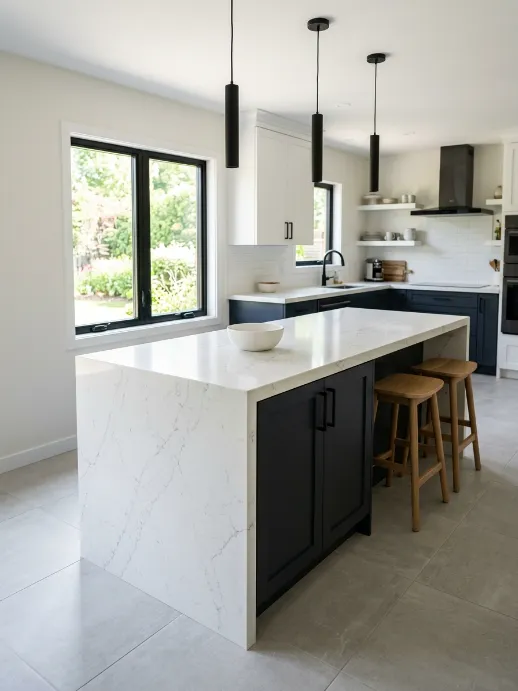
5. Waterfall Edge Peninsula

A waterfall countertop — where the stone surface drops straight down on one or both sides — looks incredibly high-end without necessarily being expensive.
In a small kitchen, it creates a visual focal point that pulls the whole design together.
Quartz and marble-look surfaces work best here. The continuous surface reads as one clean architectural element rather than a countertop sitting on top of a cabinet box.
Wow, the difference it makes in photos alone is insane.
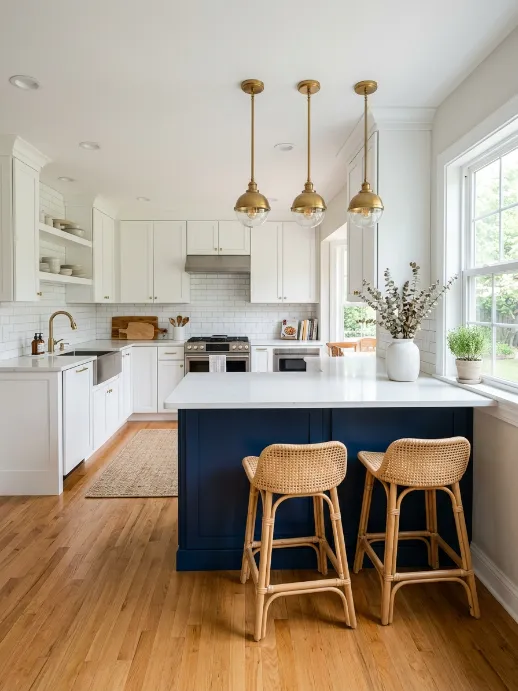
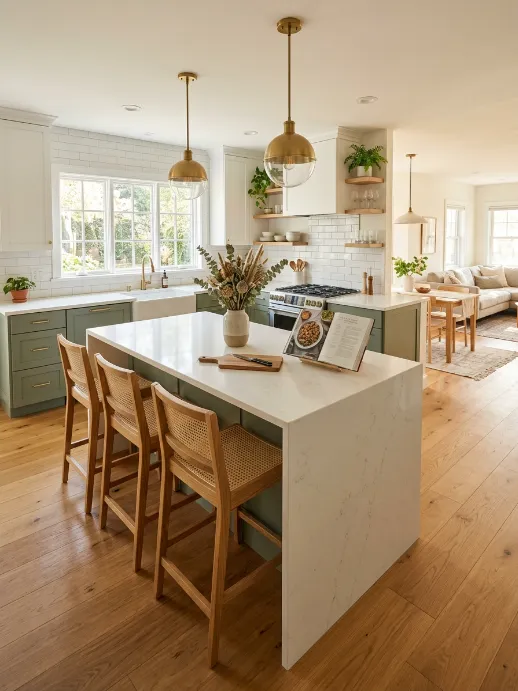
6. Contrasting Color Peninsula
Paint your peninsula a different color than the rest of your kitchen. Full stop. This is one of those low-cost, high-impact moves that designers charge a lot of money to suggest.
A white kitchen with a navy, sage green, or terracotta peninsula looks deliberately designed and incredibly cool.
I’ve seen this done in person and it’s one of those things that photographs brilliantly but also looks even better in real life, which is rare. Most trendy design choices go the other way.
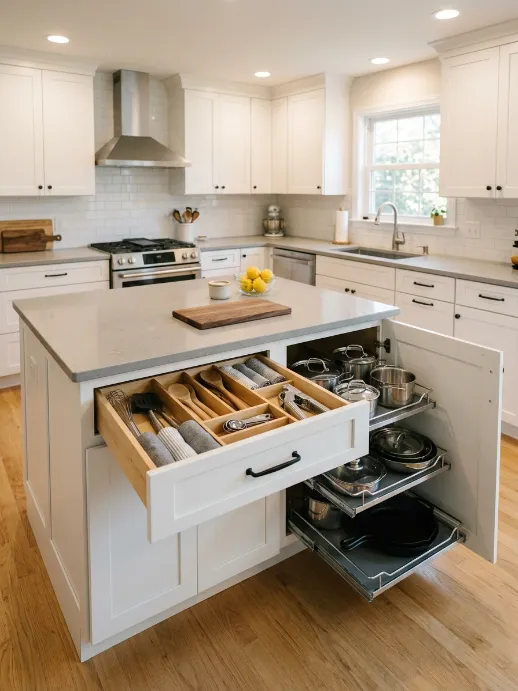
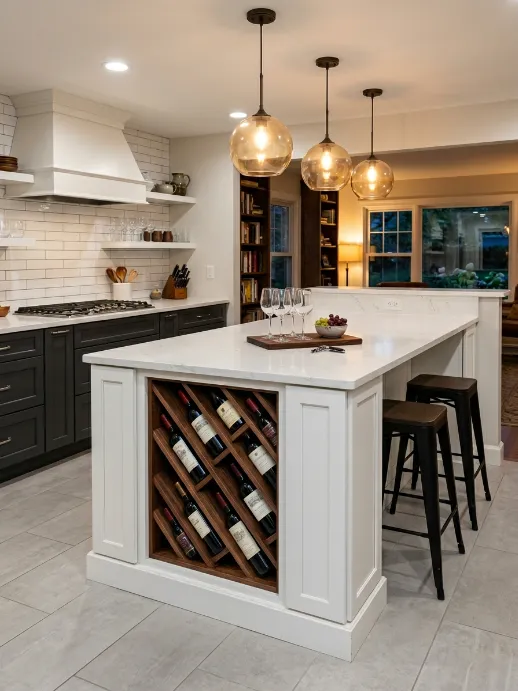
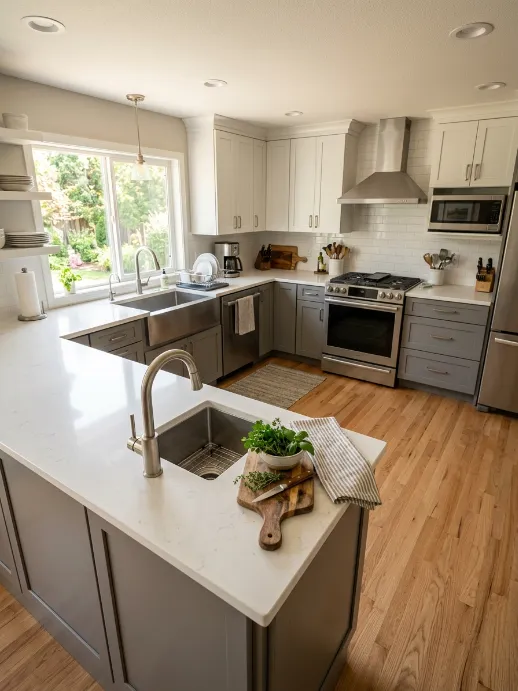
7. Built-In Storage Underneath
The base of your peninsula is basically free storage that most people underuse. Cabinets, drawers, pull-outs, wine racks — you can configure this space however your kitchen needs it most.
In a small kitchen, every cubic foot of storage matters, so don’t leave the peninsula base empty or treat it as an afterthought.
When I spec’d out my own kitchen reno, the peninsula base storage ended up holding my stand mixer, my cast iron, three cutting boards, and a full drawer of baking supplies. That freed up an entire wall cabinet for everyday dishes.
8. The Floating Leg Peninsula
Use tapered legs or hairpin legs instead of a solid enclosed base on your peninsula. The “floating” effect opens up the sightline at floor level, which tricks the eye into reading the space as larger.
It also makes sweeping and mopping underneath about a thousand times easier — which, trust me, you’ll appreciate after the first week.
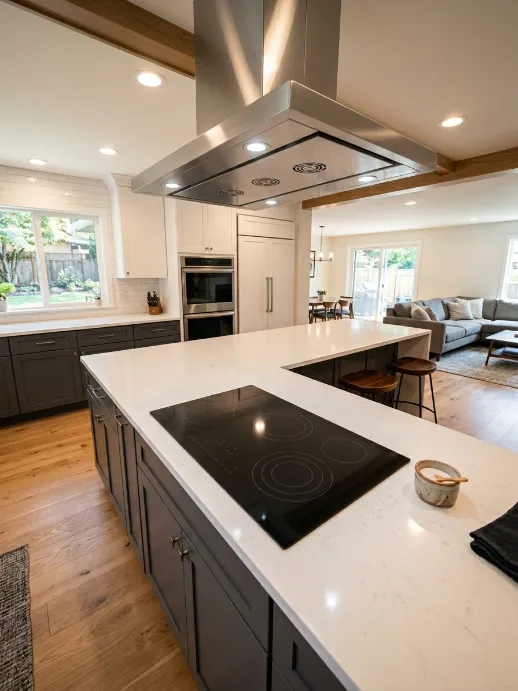
9. Peninsula With Built-In Cooktop
If your ventilation setup allows it, placing the cooktop on the peninsula is genuinely a game-changer.
You face the dining room or living area while you cook, which means you’re part of the conversation instead of staring at a wall. It also clears up your wall counter space significantly.
You’ll need either a ceiling-mounted range hood or a downdraft ventilation system. Neither is cheap, but the layout payoff is real.
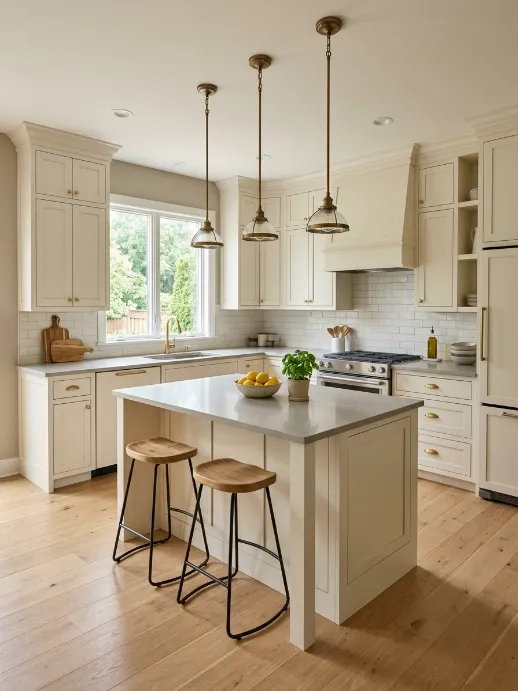
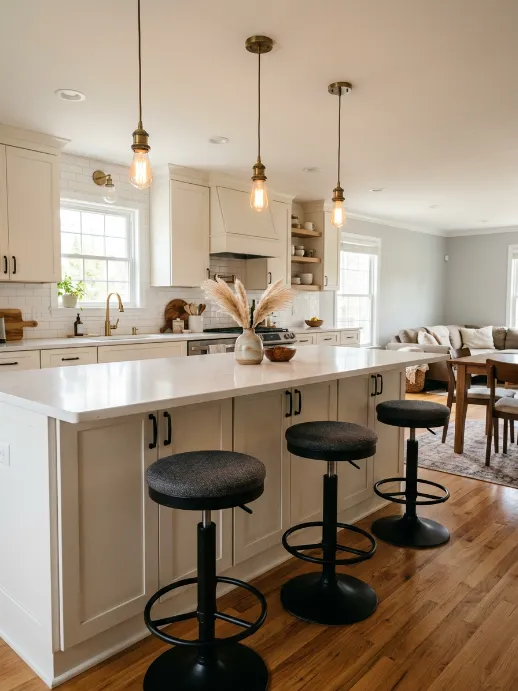
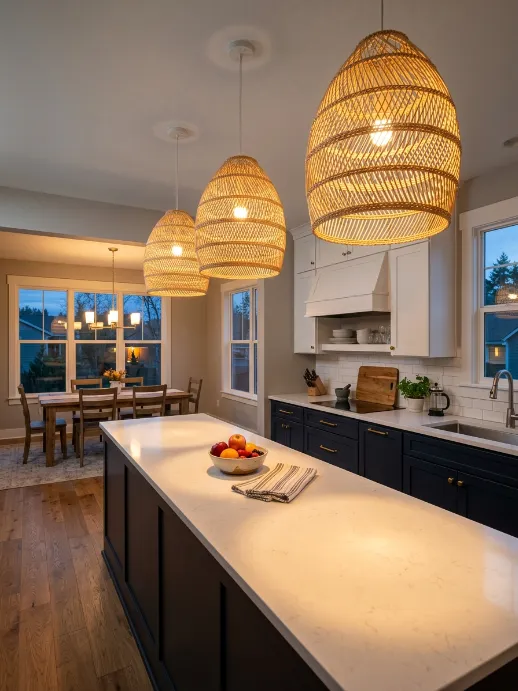
10. Pendant Lighting Above the Peninsula
Three evenly spaced pendant lights above a peninsula. That’s it. That’s the whole tip. It takes a functional surface and turns it into a design feature.
The right pendant light makes your kitchen look like it belongs in a magazine.
Quick pendant sizing guide:
- Hang 30–36 inches above the countertop surface
- Space pendants 24–30 inches apart from center to center
- Scale the pendant size to match your peninsula length
- Go dimmable — trust me on this one
Matte black, aged brass, and rattan are all having a real moment right now. Personally, I lean toward matte black in smaller kitchens because it adds contrast without feeling heavy.
11. Mixed Material Peninsula
Combine a butcher block top with painted or stained lower cabinets for a warm, layered look that feels collected and intentional rather than all-one-thing. Mixing materials adds depth to a small kitchen without adding clutter or visual noise.
I tried a version of this with a white cabinet base and walnut butcher block top, and the combination felt genuinely warm and custom. Honestly, this trend feels evergreen — it’s one of those combinations that never really goes out of style.
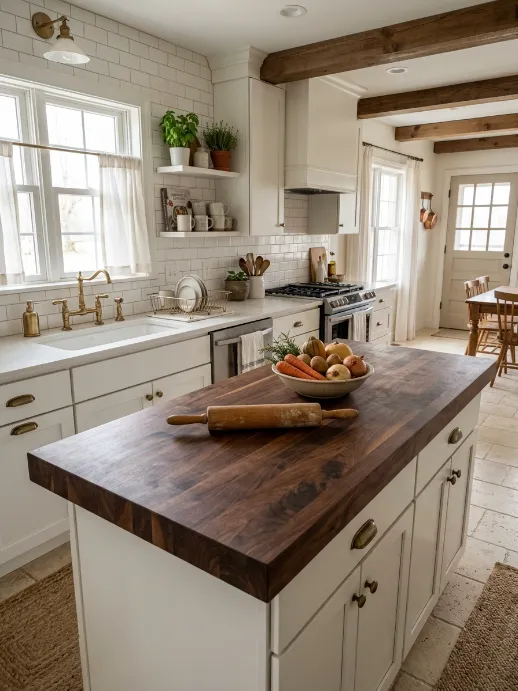
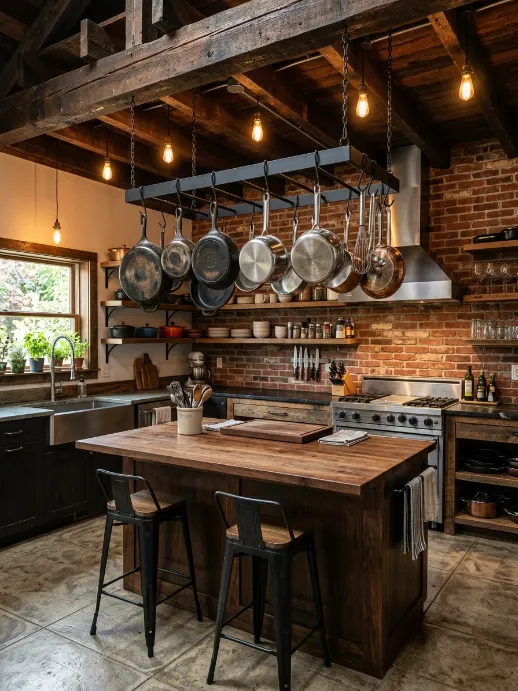
12. Butcher Block Peninsula Countertop
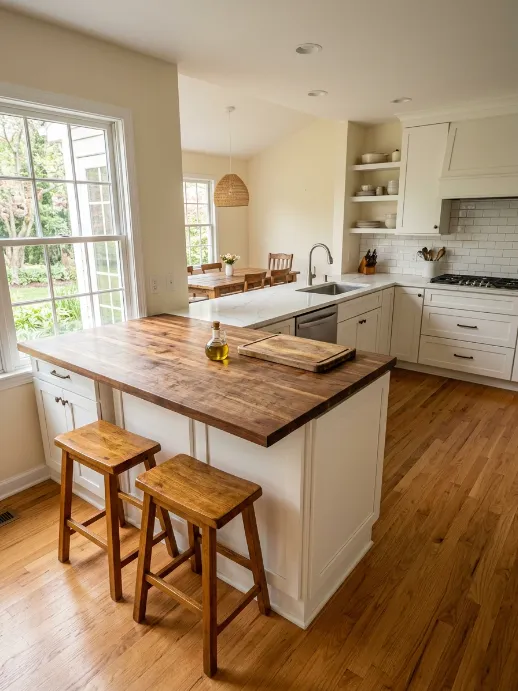
Butcher block is warm, affordable, and functional in ways that stone countertops aren’t. You can cut directly on it, it repairs with sanding if it scratches, and it gets better-looking with age if you oil it regularly.
The John Boos maple block specifically is built to last decades — I’ve seen 20-year-old versions that look stunning.
The one downside? You have to oil it. Skip that step and it’ll dry out and crack. But bro, it takes five minutes every few months — not exactly a dealbreaker.
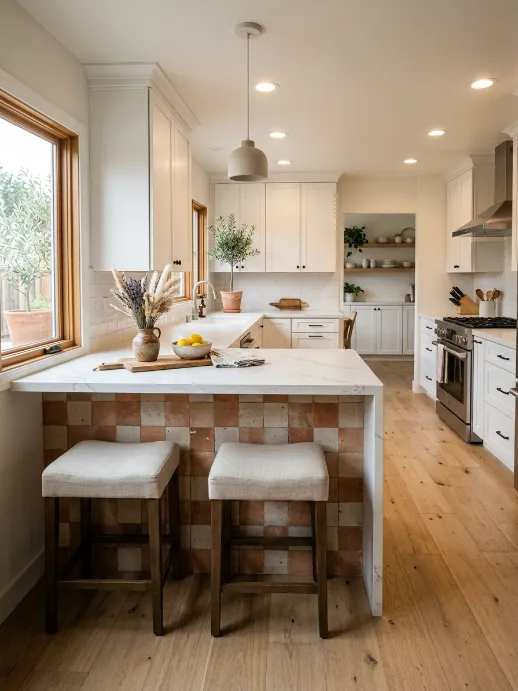
13. Textured Tile on the Peninsula Base
Use zellige tile, subway tile, or patterned cement tile on the exposed face of your peninsula base. It’s an awesome way to add personality without overwhelming a small kitchen. The texture creates visual depth that flat-painted surfaces just can’t replicate.
This works especially well if your kitchen has open-plan connection to a living area — that tiled peninsula face becomes part of the room’s overall design, not just a kitchen element.
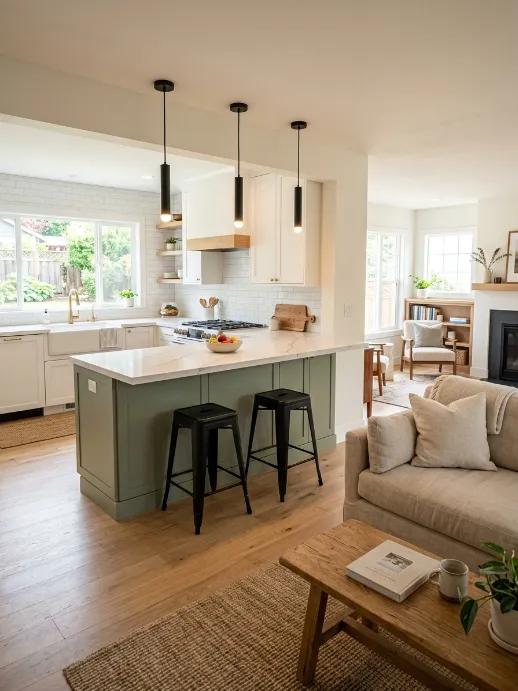
14. Peninsula as Room Divider
In open-plan homes and apartments, the peninsula does double duty as a soft architectural boundary between the kitchen and the living space.
It defines zones without the weight of a wall. Add pendant lighting above it and suddenly it looks like it was always meant to be there — not added as an afterthought.
What to consider:
- Keep the peninsula height consistent with your counter height (36 inches standard) unless you’re specifically raising it for privacy
- Use the living-room-facing side as a design statement — tile, shiplap, or contrasting paint finish
- Make sure electrical outlets are planned into the design from the start
15. Curved Peninsula Edge
Most peninsulas are rectangular. A curved or rounded edge on the open side improves traffic flow, softens the visual boundary between kitchen and living areas, and honestly just looks killer in photos. It’s not a common choice, which is exactly why it stands out.
16. Peninsula With Built-In Wine Rack
Cut out a section of the base cabinet on the open face of your peninsula and build in a diagonal wine bottle rack. It holds 8–12 bottles, looks impressive, and keeps wine accessible without taking up a single inch of counter space. For people who entertain regularly, this is a no-brainer addition.
17. Peninsula With Prep Sink
Adding a small prep sink to your peninsula means two people can work in the kitchen at the same time without constantly crossing paths.
This is a bigger investment — you’re running plumbing — but the daily usability improvement is very real.
A 15-inch bar sink is all you need here. It handles rinsing produce, filling pots, and washing hands without requiring a full 30-inch basin.
18. Galley Kitchen Peninsula Conversion
Got a galley kitchen? Add a small peninsula at one end to close the corridor into a U-shape.
You go from one long pass-through to a defined, three-sided kitchen with a natural work zone. It feels completely different — more purposeful, less hallway-like.
I did a budget version of this once using a freestanding IKEA kitchen cart positioned at the end of a galley rental kitchen. Not a real peninsula, obviously, but it proved the concept. Worked brilliantly.
19. Dark Lower Cabinets, Light Peninsula
Dark lower cabinets paired with a lighter peninsula is a combination that’s having a real moment in kitchen design right now. The contrast reads as intentional and cool, and it creates the visual impression that the peninsula is a separate design feature — which actually makes the kitchen feel larger.
Charcoal gray or navy lowers with an off-white or light oak peninsula is the specific combination I’d go with if I were designing this setup tomorrow.
20. Peninsula With Smart Drawer Organizers
This is a small thing that makes an enormous difference. Drawer dividers, spice inserts, and knife blocks built into the peninsula drawers turn an ordinary storage space into a genuinely organized system.
A well-organized kitchen actually feels bigger because you’re not digging through chaos every time you cook.
The key is planning this during the remodel, not after. Tell your cabinet maker exactly what you want to store in each drawer before they build it.
21. Shiplap or Patterned Back Panel

Use the open-facing side of your peninsula as a design statement wall. Shiplap, V-groove paneling, or large-format patterned wallpaper applied to that face adds texture and character to the whole kitchen. FYI, this is one of those changes that costs very little but photographs like a million bucks.
22. Extending Into the Dining Area
If you have even a few extra feet between your kitchen and dining area, consider extending the peninsula slightly further into that space to create a longer breakfast bar. You go from seating two people to seating four — which is the difference between a casual snack spot and an actual dining solution.
23. Pot Rack Above the Peninsula

Mount a ceiling-suspended pot rack directly above your peninsula. It keeps your most-used cookware within arm’s reach, frees up cabinet space below, and looks genuinely awesome in rustic, industrial, or farmhouse-style kitchens.
This one flopped for me though — my ceiling was too low and the pot rack ended up feeling intrusive. Make sure you have at least 7 feet of ceiling clearance before committing to this idea.
24. Integrated Cutting Board Surface
A pull-out cutting board or recessed cutting board inset into the peninsula countertop is one of those quality-of-life upgrades that sounds minor until you have it. Then you can’t imagine cooking without it.
It keeps prep work contained, protects your main countertop surface, and feels very efficient.
25. Smart Lighting: Layered Approach

Pendants above the peninsula are great, but combining pendant lighting with under-cabinet strips on the kitchen-facing side creates a layered lighting effect that makes the whole kitchen look bigger and brighter.
Task lighting plus ambient lighting plus accent lighting — hit all three and the space transforms.
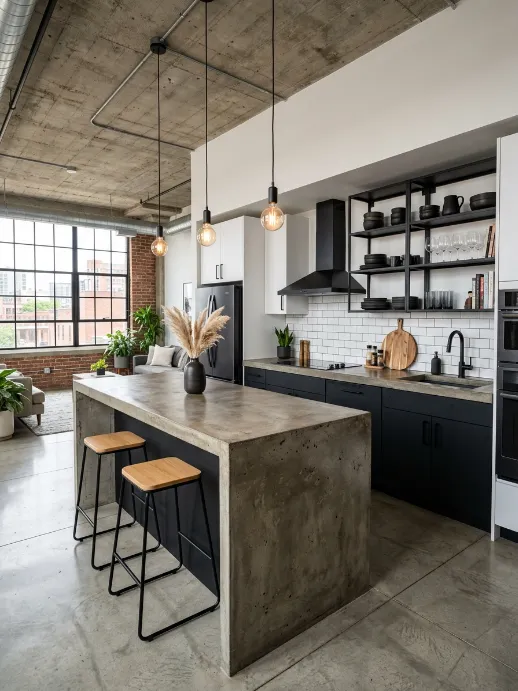
26. Concrete Countertop Peninsula
Poured concrete is heat-resistant, completely customizable in color and texture, and gives a one-of-a-kind industrial or modern look that no two kitchens share.
It’s heavier and requires sealing, but if you’re going for a specific aesthetic, nothing else quite replicates it.
For small kitchens that lean into the urban-loft vibe, a concrete peninsula top paired with open steel shelving and matte black fixtures is an absolutely killer combination.
Comparison: Peninsula Vs. No Peninsula
| Feature | With Peninsula | Without Peninsula |
|---|---|---|
| Counter Space | Significantly increased | Wall-limited only |
| Dining Solution | Built-in bar seating possible | Separate table required |
| Storage Added | Cabinets, drawers, wine rack | No addition |
| Room Zoning | Natural, open-plan friendly | Undefined or walls only |
Tips Before You Start Your Remodel
Before you pull out the demo hammer, here are the things I wish someone had told me earlier:
- Measure your walkways first — 42 inches on the working side is non-negotiable
- Plan your storage needs before choosing cabinet configurations, not after
- Consider your lighting in the design phase, not as an afterthought
- Decide on seating early — overhang depth affects the whole peninsula width
- I personally always recommend getting at least three contractor quotes because the range is always shocking
- Match countertop material to how you cook — not how it looks in photos. This one matters more than people think.
- Go to a kitchen showroom and actually sit at different peninsula heights before deciding. I didn’t do this and regretted it.
FAQ: Small Kitchen Peninsula Remodel

Q: What is the minimum kitchen size for a peninsula? A: Most designers recommend at least a 10×10 foot kitchen, but slim peninsulas (18–24 inches deep) can work in smaller layouts. It’s all about walkway clearance — 42 inches on the working side minimum.
Q: How much does a peninsula addition cost? A: A basic peninsula addition starts around $1,500–$3,000 for simple builds. A full kitchen remodel incorporating a peninsula can reach $15,000–$20,000+ depending on materials, plumbing, and labor in your area.
Q: Can I add a peninsula to a rental kitchen? A: Yes — freestanding butcher block carts positioned at the end of a cabinet run can replicate the function. Not permanent, but genuinely effective. HGTV’s rental kitchen ideas cover this really well.
Q: Is a peninsula or island better for a small kitchen? A: Peninsula almost always wins in small kitchens. It needs clearance on three sides instead of four, which saves significant floor space. The Spruce has a solid breakdown if you want to dig into the comparison.
Q: What countertop material works best for a peninsula? A: Quartz is the most practical — durable, low-maintenance, and available in a huge range of looks. Butcher block is the best choice if you want warmth and don’t mind a little maintenance. Concrete is great if you’re going for an industrial aesthetic specifically.
Wrapping Up — Go Make That Kitchen Work For You
A small kitchen isn’t a limitation. It’s just a puzzle that needs the right solution — and for most people, a peninsula is exactly that solution.
Whether you go all-in with a built-in cooktop and prep sink, or keep it simple with a slim overhang and a couple of bar stools, the core benefit is the same: more space, better flow, a kitchen that actually works.
Start with how you cook, not with what looks good on Instagram. Design around your real habits and the kitchen will serve you every single day.
So — which of these 26 ideas actually caught your eye? Are you thinking about a full remodel or just adding a peninsula to an existing layout? Drop your situation in the comments — I’d genuinely love to know what you’re working with! 🙌